Are you a beginner eager to learn how to build a WordPress website for beginners? You’re in the right place! In this guide, I’ll walk you through the entire process of creating a professional-looking website, and provide you with templates to make the task even easier.
The Core Benefits of Building Your Own WordPress Site
Building a WordPress website offers numerous advantages, especially for beginners:
- Cost-Efficiency: Avoid high developer fees by managing your website yourself.
- Customization: WordPress offers numerous themes and plugins to tailor your site.
- Control: You’re in charge of every aspect of your website.
This guide will use the example of a construction company website, but you can apply the same principles to any business.
Plus, I’ll provide all the basic templates you need at the end of the tutorial! These templates are not only beginner-friendly but also professional, offering a solid foundation to structure your website with ease.
Step-by-Step Guide: How to Build a WordPress Website for Beginners
1. Setting Up Locally
Start by setting up a local development environment. This allows you to build and test your site without affecting a live server. I highly recommend Local by Flywheel for this purpose.
When I first started using WordPress, I didn’t even know how to set up a local environment. I tried editing my site directly on the live server—big mistake! It was like playing with fire. That’s when I discovered Local by Flywheel, and trust me, it’s a lifesaver. I was able to experiment freely without worrying about crashing a live site. You’ll love it too if you’re just starting out!
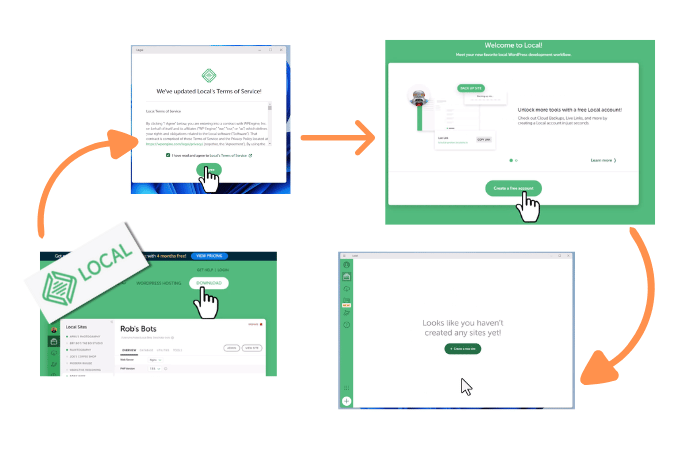
Downloading and installing Local by Flywheel
Start by downloading and installing Local by Flywheel. The setup process is straightforward, but some steps can be confusing at first.

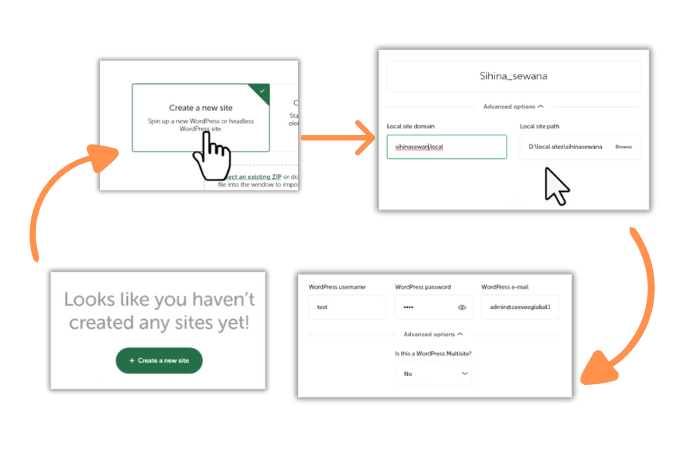
For example, during installation, you’ll be prompted to choose a local site path—this determines where your site files will be stored on your computer. Don’t worry if you’re unsure; you can easily select a location that’s convenient for you.
Create a new WordPress site within the application
When creating your WordPress site, I used sihinasewana.local as my site domain. This is just a placeholder for local development, so feel free to choose a name that suits your project. You’ll also need to set your WordPress username, password, and email address. Once everything is configured, your site will start running. You’ll know it’s active because of the red “Stop Site” button in the top left corner of the Local dashboard.

Delete unwanted posts, plugins, and pages to start fresh.
Now, you’ll see two options: one to visit your WordPress admin dashboard and another to preview your site. Start by logging into the admin dashboard. For a clean setup, delete all the pre-installed posts, pages, and plugins. Don’t forget to empty the trash afterward. This is a best practice for every project to ensure you’re working in a clutter-free environment.
2. Designing Your Pages
Designing your website might feel overwhelming at first, but with the right setup and tools, it becomes much easier. Start by activating the NEVE theme and deleting any unnecessary themes to keep your environment clean and clutter-free. A tidy workspace helps a lot when you’re learning!
Still, you can use any theme you prefer—there are no restrictions.
Next, install the Elementor plugin for page-building. If you’re planning to upload templates using the Theme Builder, you might need Elementor Pro, which I recommend for its advanced features. (Pro tip: Elementor Pro is a game-changer, especially for beginners. It simplifies tasks like adding custom headers and footers. Check it out!)
Step-by-Step Process to Set Up Your Website
- Create Pages:
- Add essential pages: Home, Projects, Services, and Contact Us.
- Don’t forget to include a Blog page if you plan to showcase articles or updates.
- Set Up Menus:
- Create a main menu and assign it to the header location.
- Add all the pages you created to this menu for smooth navigation.
- Customize Your Theme:
- Adjust the color palette to match your brand.
- Hide unnecessary page titles to keep your design clean.
- Set a static homepage by going to Settings > Reading and choosing your Home page.
- Add a Site Icon and Tagline:
- I missed this step in my tutorial, but you shouldn’t!
- You can use tools like a bulk domain generator to craft a catchy tagline.
How to Add Elementor Templates to Your Pages
Once your pages are created, it’s time to design them using the Elementor templates provided. Follow these steps:
- Edit Your Page with Elementor:
- Navigate to the page you want to design (e.g., Services or Home).
- Click on Edit with Elementor to open the page builder.
- Upload the Template:
- Click on the folder icon in Elementor to open the Template Library.
- Choose Upload Template and select the provided JSON file.
- Once uploaded, click Insert to add the template to your page.
- Customize the Template:
- Update the text, images, and sections to match your content.
- Don’t forget to check the design’s responsiveness on mobile, tablet, and desktop.
- Repeat for Other Pages:
- Apply the same process to add templates to your Home, Projects, Services, and Contact Us pages.
- You can also build from scratch if you don’t want to use templates, but the provided ones are perfect for beginners.
Designing Headers and Footers with Elementor Theme Builder
Headers and footers are critical for navigation and branding. If you’re using Elementor Pro, follow these steps:
- Open the Theme Builder in Elementor.
- Create a new Header or Footer template.
- Upload my JSON file template, or design your own from scratch.
- Assign the template to the entire website or specific pages as needed.
If you don’t have Elementor Pro, you can still build your headers and footers manually by customizing the NEVE theme’s options.
Building Headers and Footers:
Using the Elementor Theme Builder, create custom headers and footers. If you have Elementor Pro, upload my provided JSON templates directly. If not, you can build them from scratch and customize them however you like. For detailed instructions, watch the video tutorial I’ve included.
Designing Pages with Templates:
Use the provided templates to design your pages—this is especially helpful for beginners. Simply upload the templates into Elementor and tweak them to fit your style. Keep these tips in mind:
- Always check for responsiveness (make sure your site looks great on mobile, tablet, and desktop).
- Use AI tools to assist in generating content, but focus on tailoring it to your specific project for SEO optimization.
If you’re feeling creative, don’t hesitate to build your own designs! The templates I’ve included are a great starting point, but you have the freedom to experiment and make your site uniquely yours.
With these steps, you’ll have a professional-looking website in no time, and the satisfaction of building it yourself will be unbeatable.
3. Moving to a Live Server
Once your site is ready, it’s time to make it live! The first time I migrated my site, it broke completely, and I had no idea what to do. After some trial and error (and a bit of panic), I found that All-in-One WP Migration was a lifesaver. Here’s how I do it now, with a few pro tips to make the process smoother:
- Clean Your Live Site:
Before importing your site, make sure your live WordPress installation is clean. Delete any demo content, themes, or plugins you won’t use. It’s like starting with a fresh canvas. Personally, I use Contabo VPS to keep all my sites in one place for easier management. - Export and Import:
- Export your site from Local by Flywheel using the All-in-One WP Migration plugin.
- Import the file to your live WordPress site using the same plugin.
- Make sure your hosting provider supports the plugin to avoid any hiccups.
- Update Site Settings:
After the migration, check and update:- Site Title: Reflect your website’s purpose.
- Tagline: Add a short description or call to action.
- Site Address (URL): Ensure it matches your live domain.
- Admin Login Troubleshooting:
If you can’t access your WordPress admin panel after importing the site, don’t worry. This can happen if the live site’s username and password differ from the local version. Use the login credentials from your Local by Flywheel installation to access the admin panel. - Secure Your Website:
Installing a security plugin like Sucuri will protect your site from malware and hackers. Combine it with UpdraftPlus for automated backups to ensure you’re always prepared in case of an emergency. - Backup Before Any Changes:
Always back up your site before making any significant changes. This simple step can save you hours of stress later.
With these steps, you’ll confidently migrate your site from local to live. Following this process ensures a smooth transition and keeps your WordPress website secure and ready for visitors.
4. Template Creation and Usage
For the local construction company, I designed templates that received fantastic feedback. Inspired by their success, I’m sharing these templates to help beginners kickstart their projects.
To use the templates:
- Download the templates from the link provided at the end of this tutorial.
- Import them into your WordPress site using the Elementor import feature.
- Customize the content to match your brand and preferences.
Advanced Section: Increasing Upload Limit in All-in-One Migration 6.77
If you encounter upload size errors during migration, here’s a solution that worked for me:
By editing the constants.php file, I managed to bypass the restriction—a trick I learned through trial and error.
// Example code snippet to increase upload limit
define('AI1WM_MAX_FILE_SIZE', 536870912); // 512 MB
This simple tweak allowed me to successfully migrate larger sites without a hitch. Always ensure you backup the file before making changes.
Conclusion
Building a WordPress website can be a rewarding experience, especially with the right guidance. I hope this tutorial provides you with the knowledge and confidence to create a website that suits your business needs. Don’t forget to download the templates provided to get started swiftly!
Template Download Section
Kickstart your WordPress website with my free, professionally-designed templates.
FAQs: Answering Your Questions
What is the best way to start building a WordPress website for beginners?
Start by setting up a local development environment using Local by Flywheel. It allows you to experiment without affecting a live site.
Which theme is recommended for a professional-looking website?
The NEVE theme is highly recommended for its simplicity and professional aesthetic.
How can I migrate my WordPress site without errors?
Use the All-in-One WP Migration plugin for seamless migration, and consider increasing the upload limit if you encounter errors.
Where can I find templates to kickstart my WordPress website?
Download the templates provided at the end of this tutorial to jumpstart your project.

