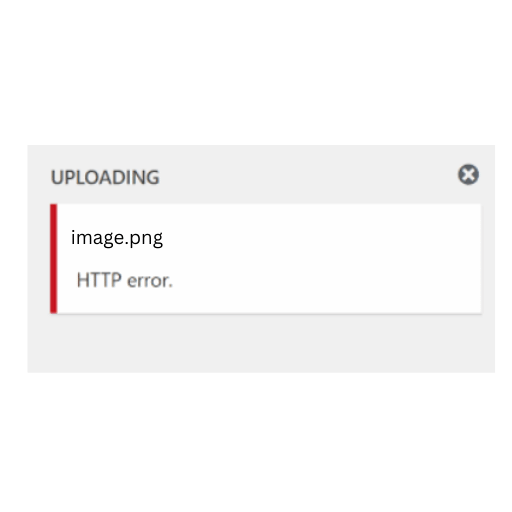
Have you ever had a frustrating situation where every attempt to upload an image to your WordPress blog ends up with an HTTP error?.????
Hey there! Today, I will enlighten you about an annoying problem that many WordPress users face: HTTP error while uploading image in WordPress.
This problem can be very annoying especially when you are trying to upload an image to your website. Whether it’s an image related to your latest blog post or a great graphic you created, running into this error can really derail your plans.
But don’t worry, I’ve got your back!????
By the end of this post, you’ll know exactly how to fix this error like a pro and keep your website looking great. Let’s dive in and fix this together!
What Causes the HTTP Error?

Before moving on to the solutions, let’s take a quick look at why this error occurs. It is important to prevent it from happening in the future.
Here are some of the common reasons I’ve found:
- File Size: Large images you use can cause this error. WordPress may struggle to handle a large file as it takes up a lot of server resources when you try to upload a large file. This can lead to an HTTP error.
- File Name: Unusual characters in the file name may cause WordPress to crash. If your image file name contains special characters like #, %, &, or spaces, it can confuse WordPress and cause an error.
- Plugins or Themes: Like most bugs, plugins or themes can conflict with the upload process. If a plugin or theme isn’t coded properly or isn’t compatible with your version of WordPress, it can interfere with image uploads. I have encountered this phenomenon on many occasions.
- Server limitations: Your hosting server may have limitations that cause the error. Servers have limits on how much data they can process simultaneously. If your server settings are too strict or out of date, you may get an HTTP error when you try to upload images.
By understanding these reasons, In the future, if you have an http error uploading an image in WordPress you can easily go to solutions.
Simple Solutions to Fix the http error uploading image wordpress
Now, let’s dive into the fixes. These steps are easy to follow and should help you get rid of the HTTP error in no time.
1. Refresh the Page
I know it sounds too simple, right? But sometimes, refreshing the page can solve the problem. Maybe it was just a temporary glitch. So, hit that refresh button and see if the error goes away.
2. Resize Your Images
Large images can be a problem for WordPress. Try resizing them using tools like TinyPNG or Photoshop. Smaller files upload faster and without errors. For example, if your image is 5000 pixels wide, try reducing it to 1200 pixels. This can make a big difference.
3. Rename the File
Make sure your image file name doesn’t have any special characters (like #, %, &, etc.). These characters can trip up WordPress. Use only letters, numbers, and hyphens.
For example, instead of naming your file “my#image%cool&photo.jpg,” name it “my-image-cool-photo.jpg.”
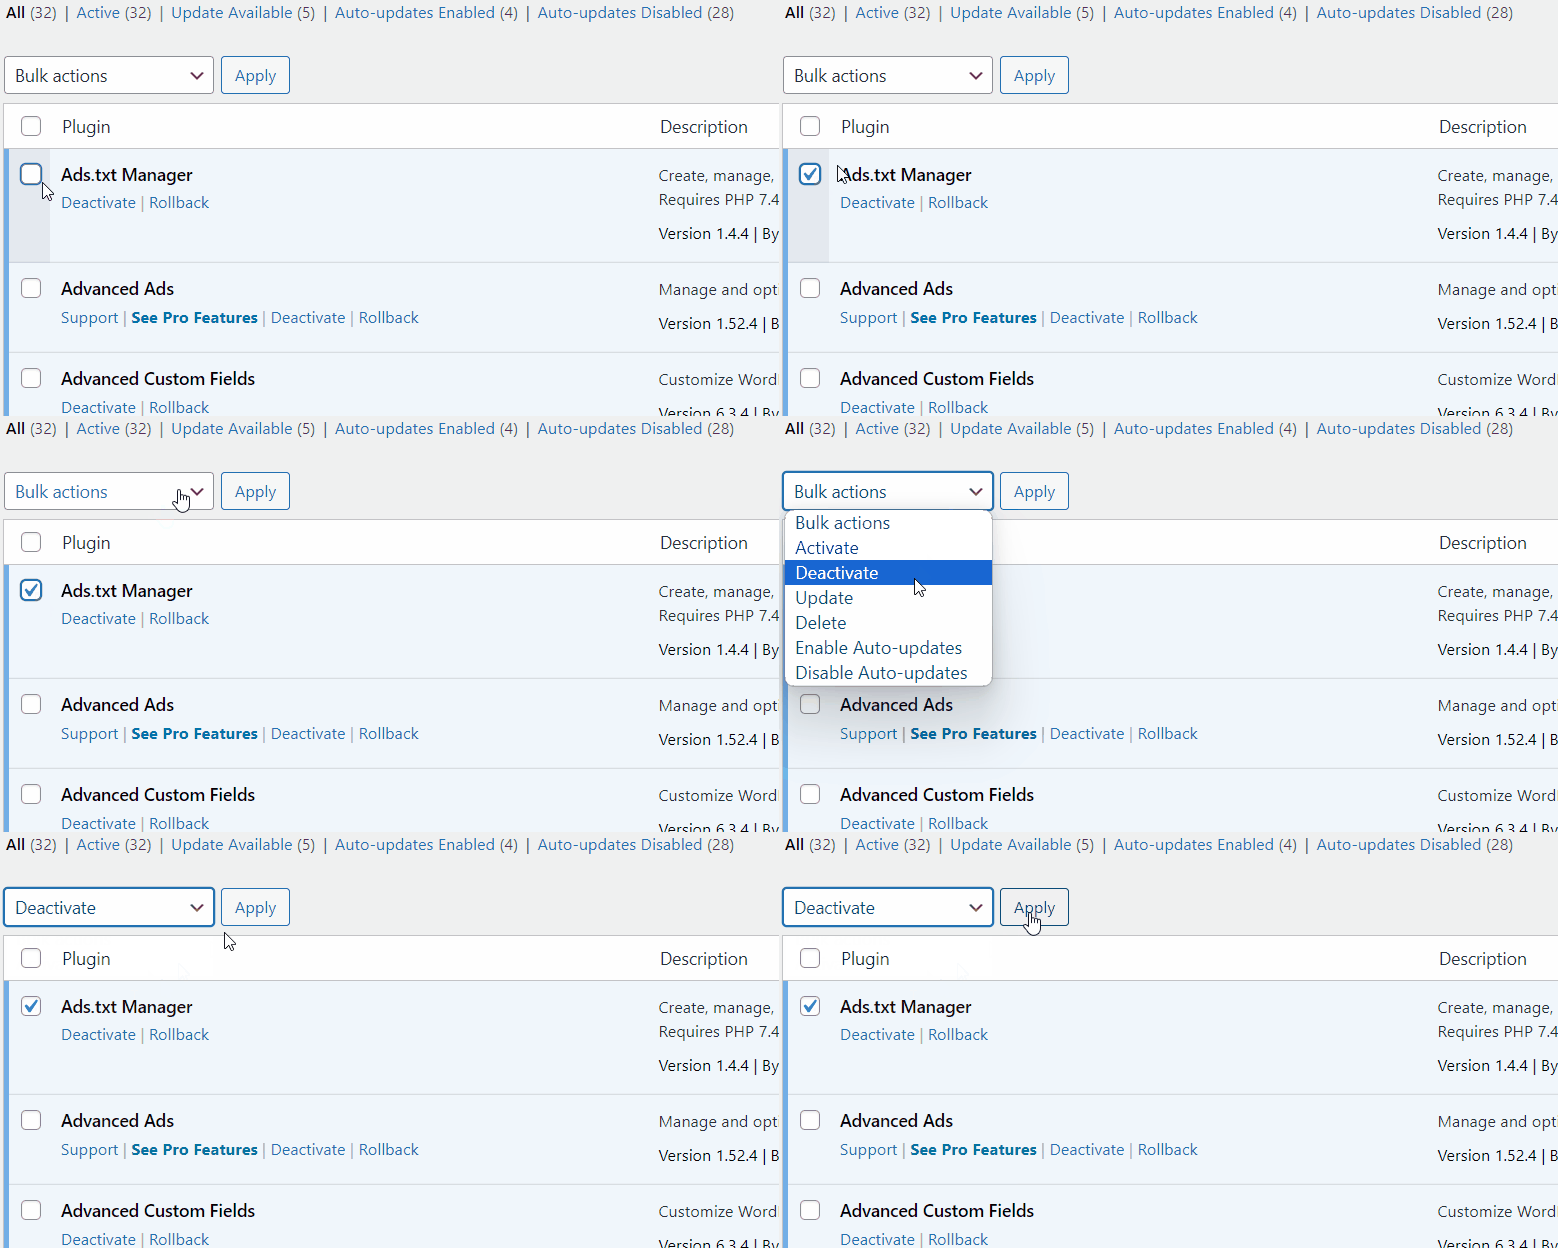
4. Deactivate Plugins and Themes
Sometimes, plugins or themes can cause conflicts that lead to HTTP errors.
Deactivate your plugins one by one to see if the error goes away. If you find the culprit, you can look for an alternative plugin.

Similarly, switch to a default theme like Twenty Twenty-One to see if your current theme is causing the issue.
5. Increase PHP Memory Limit
Low PHP memory can often be the culprit behind the HTTP error when uploading images. WordPress needs enough memory to handle tasks efficiently, and if it runs out, it can result in errors. Here’s a detailed step-by-step guide to increasing the PHP memory limit:
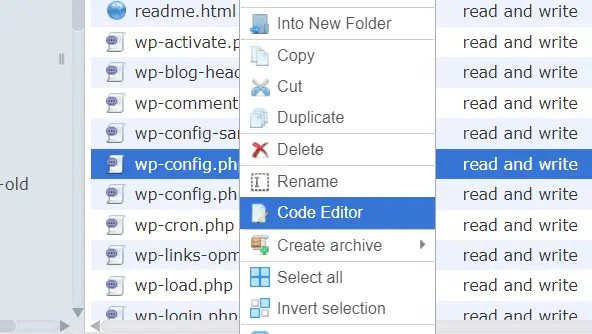
Access Your Site’s Files: To get started, you need to access your WordPress site’s files. You can do this using an FTP client like FileZilla or through the File Manager in your web hosting control panel.
Locate the wp-config.php File: Navigate to the root directory of your WordPress installation. This is usually the public_html folder or a folder named after your site. Look for the wp-config.php file, which contains important configuration settings for your WordPress site.
Edit the wp-config.php File: Open the wp-config.php file in a text editor. You can do this within your FTP client or download it, edit it on your computer, and then upload it back.
Add the Memory Limit Line: Look for the line that says /* That's all, stop editing! Happy blogging. */.
Just above this line, add the following code:
“define( 'WP_MEMORY_LIMIT', '256M' );“
This line tells WordPress to allocate 256MB of memory for its processes. Increasing the memory limit helps prevent errors during tasks that require more resources, like uploading large images.
Save and Upload the File: Save the changes to the wp-config.php file. If you edited it locally, upload it back to your server, overwriting the existing file.
Verify the Changes: Go back to your WordPress dashboard and try uploading the image again. The increased memory limit should help prevent the HTTP error.
Why This Works: By increasing the PHP memory limit, you give WordPress more resources to handle tasks. This is especially useful for tasks that require more processing power, like uploading large files or running complex plugins.
If 256MB isn’t enough, you can try increasing it further, but 256MB is typically sufficient for most sites.
6. Check Folder Permissions
Make sure your WordPress uploads folder has the correct permissions. Set it to 755 or 775. This can be done via your hosting control panel or an FTP client. Proper permissions ensure that WordPress can write to the folder without issues.
7. Update PHP Version
Running an outdated PHP version can cause problems. Check with your host to make sure you’re using a recent version of PHP, ideally PHP 7.4 or higher. Newer versions are more efficient and secure, which helps in preventing errors.
How to Check Your Current PHP Version
You can check your current PHP version in your WordPress dashboard:
- Go to Tools > Site Health.
- Click on the Info tab.
- Scroll down to the Server section. You’ll see the PHP version listed there.
How to Update PHP
Updating your PHP version involves a few steps. Here’s a detailed guide:
- Backup Your Site: Before making any changes, it’s essential to back up your site. Use a plugin like UpdraftPlus or your hosting provider’s backup service.
- Check Compatibility: Ensure your themes and plugins are compatible with the new PHP version. Visit the plugin and theme pages for any compatibility notes or updates.
- Contact Your Hosting Provider: Many hosting providers allow you to change the PHP version via their control panel. Here’s how you can do it with some popular hosts:
- cPanel:
- Log in to your cPanel account.
- Find the Software section and click on MultiPHP Manager or Select PHP Version.
- Choose the latest version (7.4 or higher) and apply the change to your domain.
- Plesk:
- Log in to your Plesk account.
- Go to Websites & Domains > PHP Settings.
- Select the latest PHP version from the dropdown menu and save your changes.
- Managed WordPress Hosting (e.g., WP Engine, Kinsta):
- These hosts usually have the option to change PHP versions in their custom dashboards. Look for Environment Settings or PHP Settings.
- Follow their instructions to update to the latest version.
- cPanel:
- Test Your Site: After updating PHP, thoroughly test your site to ensure everything works correctly. Check the front end, back end, and especially the media upload functionality.
- Revert If Necessary: If you encounter issues, you can revert to the previous PHP version through the same control panel options. Additionally, reach out to your host’s support team for assistance.
By keeping your PHP version up-to-date, you ensure your WordPress site runs efficiently and securely, minimizing the risk of errors like the HTTP error during image uploads. Plus, you benefit from the latest features and improvements that come with newer PHP versions.
8. Disable mod_security
Sometimes, mod_security, a server-side firewall module, can block your image uploads because it mistakenly thinks they are malicious. This can cause the HTTP error you’re seeing. Disabling mod_security temporarily can help you determine if it’s the source of the problem.
Here’s how you can do it:
- Access Your .htaccess File:
- First, you need to access your
.htaccessfile. This file is located in the root directory of your WordPress installation. You can access it using an FTP client like FileZilla, or through the file manager in your web hosting control panel (like cPanel or Plesk).
- First, you need to access your
- Edit the .htaccess File:
- Once you have located your
.htaccessfile, download a backup copy to your computer just in case something goes wrong. - Open the
.htaccessfile in a text editor (like Notepad or Sublime Text) to edit it.
- Once you have located your
- Add the Following Code:
- Add the following lines of code to the
.htaccessfile:
<IfModule mod_security.c> SecFilterEngine Off SecFilterScanPOST Off </IfModule>- This code tells the server to disable mod_security for your WordPress site. Specifically, it turns off the security filtering engine and stops scanning POST requests (which include file uploads).
- Add the following lines of code to the
- Save and Upload the .htaccess File:
- Save the changes to your
.htaccessfile and upload it back to the root directory of your WordPress installation, replacing the old file.
- Save the changes to your
- Test Your Image Upload:
- Go back to your WordPress dashboard and try uploading your image again. If the upload succeeds without the HTTP error, it means mod_security was indeed the cause of the problem.
- Enable mod_security Again:
- After confirming that mod_security was the issue, you have a choice to make. While you can leave mod_security disabled, it’s generally better to have it enabled for security purposes. Consider contacting your web host for a more permanent solution, such as whitelisting your specific upload process or finding another workaround.
Important Note: Disabling mod_security reduces your site’s security, so only use this solution temporarily. Always remember to turn mod_security back on or seek help from your hosting provider to find a secure and permanent fix.
By disabling mod_security temporarily, you can identify if it’s causing the HTTP error and resolve your image upload issues, ensuring your WordPress site remains functional and visually appealing.
9. Use the Add From Server Plugin
As a last resort, try the cheat I often do (just kidding. This isn’t a cheat, just a shortcut because I’m lazy) the Add From Server plugin.
It allows you to upload files directly from your server, bypassing potential upload problems.????✨ How is it?
This can be a handy tool if other solutions don’t work. Install the plugin and you can add files from your server directly to your WordPress media library.
Bonus Tip: Choose a Reliable Host
Sometimes, the root of the problem lies with your web host. Choosing a reliable WordPress host can prevent many problems, including HTTP errors.
I have presented you with the PerfectHost Finder as an answer to this problem. With that tool, you can easily find hosts known for high performance and excellent support at prices that suit you.
Conclusion
There you have it!
By following these steps, you can fix the image upload HTTP error in WordPress and keep your website running smoothly. Remember, keeping your website bug-free improves user experience and boosts your SEO efforts.
You can never run your website 100% error-free. But knowing about them to some extent, you can avoid them. I am with you for that.????
You can learn more about this from my YouTube channel.
If you are facing other WordPress errors, my WP Error Expert AI tool will help you solve many problems quickly and easily. Also for web developers, using the AI tools I developed can make your work much easier.

