
How to Fix WordPress 404 Error — Complete Guide
A WordPress 404 error means your URL routing is broken, but your content is…
DB_CONN
Your WordPress site is down. Instead of your homepage, you see a plain white screen with one devastating message:
“Error establishing a database connection.”
No dashboard access. No content. Just that error message staring back at you.
I’ve been there. Last year, ceeveeglobal.com went down because of this exact error. I was half-asleep, panicking, thinking I’d lost everything. Turns out, it was a simple fix — but only after I understood what was actually broken.
Here’s the thing: this error means WordPress can’t talk to your MySQL database. Your content is still there (probably), but WordPress can’t access it. The good news? In most cases, you can fix this yourself in 10-30 minutes without any data loss.
In this guide, I’ll walk you through exactly how to diagnose and fix this error, whether you’re on shared hosting or managing your own VPS. I’ll show you the actual commands I used, the mistakes I made (so you don’t repeat them), and how to prevent this from happening again.
Let’s get your site back online.
This error appears when WordPress cannot connect to your MySQL database. Think of it like this: WordPress is trying to make a phone call to your database, but the call won’t go through.
Every time someone visits your WordPress site, WordPress needs to:
wp-config.phpWhen any step in this process fails, you get the database connection error.
The most common causes:
Before touching any files or settings, do this:
Even if your site is down, you can still backup files:
Via cPanel:
Via FTP:
Via SSH:
# Create backup of WordPress files
cd /var/www/
tar -czf wordpress-backup-$(date +%Y%m%d).tar.gz html/

# Create backup of database (if accessible)
mysqldump -u your_db_user -p your_db_name > database-backup-$(date +%Y%m%d).sql
Sometimes other errors look similar. Test this:
Create a test-db.php file in your WordPress root directory:
<?php
$test_connection = mysqli_connect('localhost', 'your_db_user', 'your_db_password', 'your_db_name');

if (!$test_connection) {
    die('Connection failed: ' . mysqli_connect_error());
} else {
    echo 'Database connection successful!';
}

mysqli_close($test_connection);
?>
Upload this file, then visit: yourdomain.com/test-db.php
Important: Delete test-db.php after testing (security risk to leave it).
Before making changes, write down:
This helps you troubleshoot and revert changes if needed.
This is the most common cause — incorrect database information in your wp-config.php file.
Step 1: Access Your WordPress Files
You need FTP access or cPanel File Manager:
Using FileZilla (FTP):
Using cPanel File Manager:
Step 2: Find and Download wp-config.php
wp-config.php in your WordPress root directoryStep 3: Locate the Database Configuration Section
Look for these lines (usually around line 20-30):
// ** MySQL settings - You can get this info from your web host ** //
/** The name of the database for WordPress */
define( 'DB_NAME', 'database_name_here' );

/** MySQL database username */
define( 'DB_USER', 'username_here' );

/** MySQL database password */
define( 'DB_PASSWORD', 'password_here' );

/** MySQL hostname */
define( 'DB_HOST', 'localhost' );
Step 4: Find Your Correct Database Credentials
For cPanel Users:
For VPS/Server Users:
Check your database details in your server config or run:
# Connect to MySQL
mysql -u root -p

# Once logged in, run:
SELECT user, host FROM mysql.user WHERE user LIKE 'wp_%';

# Show all databases
SHOW DATABASES;
Step 5: Update wp-config.php with Correct Credentials
Replace the placeholder values with your actual credentials:
define( 'DB_NAME', 'yoursite_wpdatabase' );     // Your actual database name
define( 'DB_USER', 'yoursite_wpuser' );         // Your actual database username
define( 'DB_PASSWORD', 'your-secure-password' );// Your actual database password
define( 'DB_HOST', 'localhost' );               // Usually 'localhost', sometimes an IP
Important Notes:
' '; at the end of each lineStep 6: Check Database Host
DB_HOST is usually localhost, but not always:
Common alternatives:
localhost (most shared hosting)127.0.0.1 (IP address for localhost)localhost:3306 (with port number)mysql.yourdomain.com (some hosts use separate MySQL server)192.168.1.100How to find your correct DB_HOST:
Check your hosting provider’s documentation, or:
cPanel users:
localhostContact hosting support if you’re unsure — they can tell you immediately.
Step 7: Save and Upload
644 (most hosting) or 640 (more secure)Setting permissions via FTP:
644 or 640Setting permissions via SSH:
chmod 644 wp-config.php
Step 8: Test Your Site
Visit your domain. If you see your site instead of the error — you fixed it!
If you still see the error, move to Solution 2.
❌ Leaving extra spaces: define( 'DB_NAME', ' database_name ' ); ← Those spaces break it
✅ Correct: define( 'DB_NAME', 'database_name' );
❌ Using wrong quotes: define( "DB_NAME", "database_name" ); ← Double quotes can cause issues
✅ Correct: define( 'DB_NAME', 'database_name' ); ← Use single quotes
❌ Missing semicolon: define( 'DB_NAME', 'database_name' ) ← Missing ;
✅ Correct: define( 'DB_NAME', 'database_name' );
❌ Wrong DB_HOST: Using localhost when your host uses something else
✅ Correct: Check with your hosting provider for exact DB_HOST value
Even with correct credentials, your database user might not have proper permissions to access the database.
For cPanel Users:
Step 1: Access MySQL Databases
Step 2: Check User Association
Step 3: Grant All Privileges
For phpMyAdmin Users:
Step 1: Login to phpMyAdmin
Step 2: Check User Privileges
Step 3: Grant Required Permissions
WordPress needs these minimum permissions:
Best practice: Grant ALL PRIVILEGES for simplicity:
For VPS/SSH Users:
# Connect to MySQL as root
mysql -u root -p

# Grant all privileges to WordPress user
GRANT ALL PRIVILEGES ON your_database.* TO 'your_wp_user'@'localhost';

# If using remote database server
GRANT ALL PRIVILEGES ON your_database.* TO 'your_wp_user'@'%';

# Flush privileges to apply changes
FLUSH PRIVILEGES;

# Verify grants
SHOW GRANTS FOR 'your_wp_user'@'localhost';

# Exit MySQL
EXIT;
Step 4: Test Connection
Visit your site. If permissions were the issue, your site should load now.
If your user is completely broken, create a fresh one:
Via cPanel:
yoursite_wpuserVia MySQL:
# Create new user
CREATE USER 'new_wp_user'@'localhost' IDENTIFIED BY 'strong_password_here';

# Grant privileges
GRANT ALL PRIVILEGES ON your_database.* TO 'new_wp_user'@'localhost';

# Apply changes
FLUSH PRIVILEGES;
Then update your wp-config.php with the new credentials.
Database corruption can break the connection, especially after server crashes or improper shutdowns.
WordPress has a secret database repair tool.
Step 1: Enable Repair Mode
Edit your wp-config.php file and add this line before /* That's all, stop editing! Happy publishing. */:
define('WP_ALLOW_REPAIR', true);
Complete example:
define( 'DB_HOST', 'localhost' );
define( 'DB_CHARSET', 'utf8mb4' );
define( 'DB_COLLATE', '' );

// Enable database repair mode
define('WP_ALLOW_REPAIR', true);

/* That's all, stop editing! Happy publishing. */
Step 2: Access Repair Tool
Visit this URL directly in your browser:
https://yourdomain.com/wp-admin/maint/repair.php
Step 3: Run Repair
You’ll see two buttons:
Click “Repair and Optimize Database” for best results.
Step 4: Review Results
The tool will show results for each table:
wp_posts: OK
wp_postmeta: OK
wp_options: Table is marked as crashed and should be repaired
Repairing wp_options: OK
If you see “OK” for all tables, you’re good!
Step 5: Disable Repair Mode (CRITICAL)
After repair completes, immediately remove or comment out this line from wp-config.php:
// define('WP_ALLOW_REPAIR', true); // Disabled after repair
Security warning: Leaving this enabled allows ANYONE to access the repair tool without authentication. Always disable it after use.
If WordPress repair tool doesn’t work or you can’t access it:
Step 1: Login to phpMyAdmin
Step 2: Select All Tables
Step 3: Repair Tables
Step 4: Wait for Completion
phpMyAdmin will show repair status for each table:
wp_posts: Table is already up to date
wp_postmeta: OK
wp_options: The storage engine for the table doesn't support repair
“Already up to date” and “OK” are good. Ignore “doesn’t support repair” (InnoDB tables can’t be repaired this way, but they auto-repair).
Step 5: Optimize Tables (Recommended)
While you’re here:
This cleans up fragmentation and can improve performance.
For VPS users with command-line access:
Step 1: Check Database Status
# Login to MySQL
mysql -u root -p

# Select your database
USE your_database_name;

# Check all tables for errors
CHECK TABLE wp_posts, wp_postmeta, wp_options, wp_comments;
Output will show “OK” or “Table is marked as crashed.”
Step 2: Repair Individual Tables
# Still in MySQL shell
REPAIR TABLE wp_posts;
REPAIR TABLE wp_postmeta;
REPAIR TABLE wp_options;

# Or repair all tables at once
REPAIR TABLE wp_commentmeta, wp_comments, wp_links, wp_options,
  wp_postmeta, wp_posts, wp_termmeta, wp_terms,
  wp_term_relationships, wp_term_taxonomy, wp_usermeta, wp_users;
Step 3: Optimize After Repair
OPTIMIZE TABLE wp_posts;
OPTIMIZE TABLE wp_postmeta;
# ... repeat for all tables

# Exit MySQL
EXIT;
Alternative: Use mysqlcheck command:
# Check all tables in database
mysqlcheck -u your_db_user -p your_database_name

# Repair all tables
mysqlcheck -r -u your_db_user -p your_database_name

# Optimize all tables
mysqlcheck -o -u your_db_user -p your_database_name

# Do everything at once (check, repair, optimize)
mysqlcheck -cro -u your_db_user -p your_database_name
This is faster than manual table-by-table repair.
If you have WP-CLI installed:
# Check database integrity
wp db check

# Repair database
wp db repair

# Optimize database
wp db optimize
Simple and effective.
If repair doesn’t work:
mysqldump -u your_db_user -p your_database_name > corrupted-backup.sql
If your credentials are correct but you still can’t connect, the MySQL server itself might be down.
For cPanel Users:
Unfortunately, cPanel doesn’t show MySQL status directly. You’ll need to:
For VPS/Server Users (SSH Access):
Check if MySQL is running:
# For MySQL
systemctl status mysql

# For MariaDB (MySQL fork)
systemctl status mariadb

# Alternative command that works for both
service mysql status
Output interpretation:
Running:
● mysql.service - MySQL Community Server
   Loaded: loaded
   Active: active (running) since Mon 2025-01-06 10:23:15 UTC
Stopped:
● mysql.service - MySQL Community Server
   Loaded: loaded
   Active: inactive (dead)
Ubuntu/Debian:
# Start MySQL
sudo systemctl start mysql

# Enable auto-start on boot
sudo systemctl enable mysql

# Verify it's running
sudo systemctl status mysql
CentOS/RHEL:
# Start MySQL
sudo systemctl start mysqld

# Enable auto-start
sudo systemctl enable mysqld

# Check status
sudo systemctl status mysqld
For MariaDB:
# Start MariaDB
sudo systemctl start mariadb

# Enable auto-start
sudo systemctl enable mariadb

# Verify status
sudo systemctl status mariadb
Alternative method (works on older systems):
# Start MySQL
sudo service mysql start

# Restart MySQL
sudo service mysql restart

# Stop MySQL
sudo service mysql stop
If MySQL won’t start, check the error logs:
# View MySQL error log
sudo tail -n 50 /var/log/mysql/error.log

# For MariaDB
sudo tail -n 50 /var/log/mariadb/mariadb.log

# Alternative location
sudo tail -n 50 /var/log/mysqld.log
Common errors you might see:
Out of memory:
Cannot allocate memory for the buffer pool
Solution: Reduce MySQL memory usage or upgrade server RAM.
Too many connections:
Too many connections
Solution: Increase max_connections in MySQL config.
Port already in use:
Can't start server: Bind on TCP/IP port: Address already in use
Solution: Another process is using port 3306. Find and stop it:
sudo lsof -i :3306
sudo kill -9 [PID]
# Stop MySQL gracefully
sudo systemctl stop mysql

# Wait 5 seconds
sleep 5

# Start MySQL
sudo systemctl start mysql

# Check if it's running
sudo systemctl status mysql
If MySQL keeps crashing due to connection limits:
Edit MySQL configuration:
# Edit config file
sudo nano /etc/mysql/mysql.conf.d/mysqld.cnf

# Or for MariaDB
sudo nano /etc/mysql/mariadb.conf.d/50-server.cnf
Find and modify these settings:
[mysqld]
max_connections = 500        # Increase from default (151)
wait_timeout = 300           # Seconds before closing idle connection
max_connect_errors = 1000    # Allow more failed connection attempts
Save file and restart MySQL:
sudo systemctl restart mysql
If you’re running MySQL in Docker:
# Check if MySQL container is running
docker ps | grep mysql

# If not running, check all containers
docker ps -a | grep mysql

# Start MySQL container
docker start mysql-container-name

# View MySQL container logs
docker logs mysql-container-name

# Restart MySQL container
docker restart mysql-container-name
For Coolify users:
Sometimes the issue is that WordPress is trying to connect to the wrong server address.
DB_HOST in wp-config.php tells WordPress where to find your MySQL server. Most commonly it’s localhost, but not always.
Hosting TypeTypical DB_HOSTExampleShared HostinglocalhostlocalhostSome Shared HostsCustom hostnamemysql.yourdomain.comVPS (same server)localhostor127.0.0.1127.0.0.1VPS (with port)localhost:3306localhost:3306Remote DatabaseIP address or hostname192.168.1.50ordb.example.comDocker/CoolifyService namemysqlormariadb
Method 1: Check PHP Info
Create a file called phpinfo.php in your WordPress root:
<?php
phpinfo();
?>
Visit yourdomain.com/phpinfo.php and search (Ctrl+F) for “MYSQLI_DEFAULT_HOST” — that’s your database host.
Delete phpinfo.php after checking (security risk).
Method 2: Ask Your Hosting Provider
Contact support and ask: “What should I use for DB_HOST in wp-config.php?”
They’ll tell you immediately.
Method 3: Check cPanel (if available)
cPanel → MySQL Databases → Look for “Database Host” field near the top.
Method 4: Try Common Alternatives
If localhost doesn’t work, try these one by one in wp-config.php:
// Try these in order:
define( 'DB_HOST', 'localhost' );
define( 'DB_HOST', '127.0.0.1' );
define( 'DB_HOST', 'localhost:3306' );
define( 'DB_HOST', '127.0.0.1:3306' );
Test your site after each change.
Cloudways Users:
define( 'DB_HOST', 'localhost:/var/run/mysqld/mysqld.sock' );
Kinsta Users: Check your MyKinsta dashboard → Database access → MySQL hostname
GoDaddy Managed WordPress: Usually localhost, but check via hosting dashboard.
Docker/Coolify Setup:
If WordPress and MySQL are in separate containers:
// Use the service name from docker-compose.yml
define( 'DB_HOST', 'mysql' );  // or 'mariadb', 'db', etc.

// Or use container IP (not recommended, changes on restart)
define( 'DB_HOST', '172.18.0.2' );
Find Docker container name:
# List running containers
docker ps

# Check docker-compose.yml for service name
cat docker-compose.yml | grep -A 5 "mysql"
Use this test script (save as test-host.php):
<?php
$hosts_to_test = ['localhost', '127.0.0.1', 'localhost:3306', '127.0.0.1:3306'];

foreach ($hosts_to_test as $host) {
    echo "Testing: $host ... ";
    $connection = @mysqli_connect($host, 'your_db_user', 'your_db_password', 'your_db_name');

    if ($connection) {
        echo "SUCCESS!\n<br>";
        mysqli_close($connection);
        break;
    } else {
        echo "FAILED: " . mysqli_connect_error() . "\n<br>";
    }
}
?>
Replace credentials and upload. Visit yourdomain.com/test-host.php — it’ll show which host works.
Delete test-host.php after testing.
If nothing else works, restoring from a recent backup is your best option.
Critical: Only restore if you’re certain your current database is broken beyond repair. Restoration overwrites all current data.
1. Hosting Provider Backups
Most hosts keep automatic backups:
cPanel users:
Popular hosting backup locations:
2. WordPress Backup Plugins
Check if you have any of these installed:
3. Cloud Storage
If your backup plugin uploaded to cloud:
4. Local Computer
Did you download any backups? Check your Downloads folder for .sql, .sql.gz, or .zip files.
Step 1: Download Your Backup File
Get your .sql or .sql.gz backup file ready on your computer.
Step 2: Access phpMyAdmin
yourdomain.com/phpmyadmin (ask host for exact URL)Step 3: Select Database
Click your WordPress database name in the left sidebar (e.g., yourdomain_wp123).
Step 4: Drop Existing Tables (CAUTION)
You need to remove corrupted tables first:
Note: Your posts are not gone yet — they’re in the backup you’re about to restore.
Step 5: Import Backup
.sql or .sql.gz fileStep 6: Wait for Import
Success message:
Import has been successfully finished, X queries executed.
Step 7: Test Your Site
Visit your domain. Your site should be back online, restored to the point when the backup was created.
Faster for large databases:
Step 1: Upload Backup to Server
# Via SCP from local computer
scp database-backup.sql user@yourserver.com:/home/user/

# Or download from cloud
wget https://your-backup-url.com/database-backup.sql.gz
gunzip database-backup.sql.gz
Step 2: Drop Existing Database (CAUTION)
# Connect to MySQL
mysql -u root -p

# Inside MySQL:
DROP DATABASE your_database_name;
CREATE DATABASE your_database_name;
EXIT;
Step 3: Import Backup
# Import SQL file
mysql -u your_db_user -p your_database_name < database-backup.sql

# If it's a large file, show progress:
pv database-backup.sql | mysql -u your_db_user -p your_database_name

# If you don't have pv installed:
sudo apt-get install pv
Step 4: Verify Import
# Connect to MySQL
mysql -u root -p

# Check tables exist
USE your_database_name;
SHOW TABLES;

# Should show wp_posts, wp_options, etc.

EXIT;
If WP-CLI is installed:
# Import database from SQL file
wp db import database-backup.sql

# Alternative: Directly from backup plugin
wp updraftplus restore [backup_id]
If you can access your dashboard (maybe wp-admin works but frontend doesn’t):
If you truly have no backups:
web.archive.orgIf you restored from a backup made on a different domain or migrated sites:
Update site URLs via SQL:
-- Connect to database
mysql -u your_db_user -p your_database_name

-- Update URLs (replace with your actual domain)
UPDATE wp_options SET option_value = 'https://yourdomain.com'
WHERE option_name = 'siteurl' OR option_name = 'home';

-- Exit
EXIT;
Or via wp-config.php (temporary override):
define('WP_HOME','https://yourdomain.com');
define('WP_SITEURL','https://yourdomain.com');
For VPS users who’ve tried everything else and still have the error.
Memory exhaustion can prevent MySQL from accepting connections.
# Check current memory usage
free -h

# Output:
#               total        used        free
# Mem:           2.0G        1.8G        200M
# Swap:          1.0G        800M        200M
If “free” is very low (< 100MB), MySQL may not have enough RAM.
Check which processes use the most memory:
# Show top memory-consuming processes
ps aux --sort=-%mem | head -n 10

# Real-time monitoring
htop
If MySQL is using excessive memory:
# Check MySQL memory settings
mysql -u root -p -e "SHOW VARIABLES LIKE '%buffer%';"

# Reduce memory usage by editing config
sudo nano /etc/mysql/mysql.conf.d/mysqld.cnf
Optimize memory settings for low-RAM servers:
[mysqld]
innodb_buffer_pool_size = 128M    # Default is often too high
key_buffer_size = 16M
max_connections = 100              # Reduce from default
table_open_cache = 64
Restart MySQL after changes:
sudo systemctl restart mysql
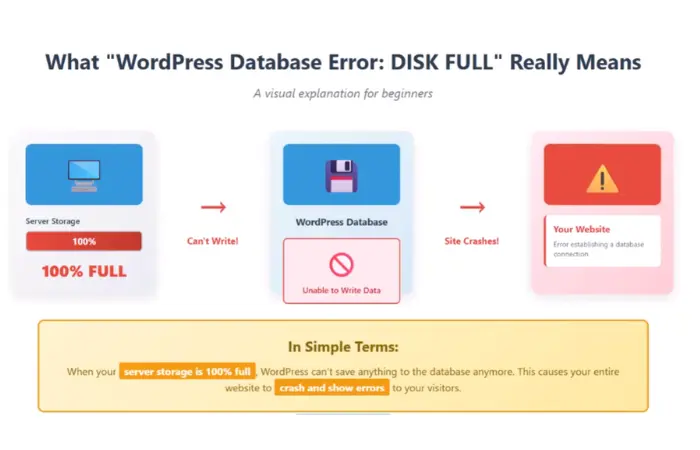
MySQL needs disk space to write data and temporary files.
# Check disk usage
df -h

# Output:
# Filesystem      Size  Used Avail Use% Mounted on
# /dev/vda1        40G   38G  2.0G  95% /
If disk is > 90% full, MySQL may fail. See my guide on fixing WordPress disk full errors.
Quick cleanup:
# Remove old logs
sudo journalctl --vacuum-time=7d

# Clean apt cache (Ubuntu/Debian)
sudo apt-get clean

# Find large files
sudo find / -type f -size +100M -exec ls -lh {} \;
Too many connections can block new ones.
# Check current connections
mysql -u root -p -e "SHOW PROCESSLIST;"

# Check max_connections setting
mysql -u root -p -e "SHOW VARIABLES LIKE 'max_connections';"

# Check current active connections
mysql -u root -p -e "SHOW STATUS LIKE 'Threads_connected';"
If you’re hitting the limit, increase it:
# Edit MySQL config
sudo nano /etc/mysql/mysql.conf.d/mysqld.cnf

# Add or modify:
[mysqld]
max_connections = 500

# Restart MySQL
sudo systemctl restart mysql
Firewall might block MySQL port 3306.
# Check if port 3306 is listening
sudo netstat -tlnp | grep 3306

# Output should show:
# tcp        0      0 127.0.0.1:3306          0.0.0.0:*               LISTEN      1234/mysqld

# Check UFW firewall status (Ubuntu)
sudo ufw status

# If MySQL needs external access, allow port
sudo ufw allow 3306/tcp
Note: For security, MySQL should only listen on localhost unless you’re using a remote database.
SELinux can block MySQL connections.
# Check if SELinux is enforcing
getenforce

# Temporarily disable to test
sudo setenforce 0

# Test your WordPress site - does it work now?

# If yes, you need to configure SELinux properly:
sudo setsebool -P httpd_can_network_connect_db 1

# Re-enable SELinux
sudo setenforce 1
MySQL uses a socket file for local connections. If it’s missing or in the wrong location:
# Find where MySQL socket file should be
mysql -u root -p -e "SHOW VARIABLES LIKE 'socket';"

# Output shows path, commonly:
# /var/run/mysqld/mysqld.sock
# or /tmp/mysql.sock

# Check if file exists
ls -la /var/run/mysqld/mysqld.sock

# If missing, MySQL isn't running properly
sudo systemctl restart mysql
If WordPress can’t find the socket, update DB_HOST:
// In wp-config.php, specify socket path:
define( 'DB_HOST', 'localhost:/var/run/mysqld/mysqld.sock' );
The error log reveals what’s wrong with MySQL:
# View last 50 lines of MySQL error log
sudo tail -n 50 /var/log/mysql/error.log

# For MariaDB
sudo tail -n 50 /var/log/mariadb/mariadb.log

# Watch log in real-time while testing
sudo tail -f /var/log/mysql/error.log
Common errors and fixes:
“Table ‘./wordpress/wp_options’ is marked as crashed”
wp db repair or use phpMyAdmin repair“Can’t connect to MySQL server on ‘localhost’ (111)”
sudo systemctl start mysql“Access denied for user ‘wp_user’@’localhost'”
“Too many connections”
# Try connecting with WordPress credentials
mysql -u your_wp_user -p -h localhost your_database_name

# If this WORKS, your credentials are correct
# Problem is elsewhere (permissions, PHP config)

# If this FAILS, you'll see exact error message
# Example: "Access denied" = wrong password
WordPress needs PHP’s MySQL extension to connect.
# Check if mysqli extension is loaded
php -m | grep -i mysql

# Should show:
# mysqli
# mysqlnd

# If missing, install it:
sudo apt-get install php-mysql

# For specific PHP version:
sudo apt-get install php8.1-mysql

# Restart web server
sudo systemctl restart apache2
# or
sudo systemctl restart nginx
sudo systemctl restart php8.1-fpm
Check if containers can communicate:
# List networks
docker network ls

# Inspect network
docker network inspect your_network_name

# WordPress and MySQL should be on same network

# Test connection from WordPress container to MySQL
docker exec -it wordpress_container_name sh
# Inside container:
ping mysql
telnet mysql 3306
Check environment variables:
# View WordPress container environment
docker exec wordpress_container_name env | grep DB_

# Should match your database credentials
Check Coolify logs:
# In Coolify dashboard, view logs for:
# - WordPress application
# - MySQL service
# Look for connection errors
After fixing the error, implement these preventative measures.
Use UpdraftPlus (my recommendation):
Test your backup:
Cost: Free plugin + cloud storage ($0-5/month)
Install Query Monitor plugin:
Check database size regularly:
# Via WP-CLI
wp db size --human-readable

# Via MySQL
mysql -u root -p -e "SELECT table_schema AS 'Database',
  ROUND(SUM(data_length + index_length) / 1024 / 1024, 2) AS 'Size (MB)'
  FROM information_schema.tables
  GROUP BY table_schema;"
Set up database optimization schedule:
Install monitoring tools:
Netdata (my choice for ceeveeglobal.com):
Setup guide: Check Coolify monitoring documentation
Set alerts for:
Never:
Best practices:
Before updating WordPress, plugins, or themes:
Install Uptime Robot (free):
Weekly:
Monthly:
Quarterly:
Why it fails:
Real consequence: User added extra space in DB_NAME, broke site, couldn’t remember original database name, spent 3 hours troubleshooting.
Correct approach:
Why it fails:
// ❌ WRONG - Curly/smart quotes break PHP
define( "DB_NAME", "database_name" );

// ❌ WRONG - Mix of quote types
define( 'DB_USER', "username" );

// ✅ CORRECT - Straight single quotes
define( 'DB_NAME', 'database_name' );
How it happens: Copying from Word, email, or some websites converts quotes to “smart quotes.”
Correct approach:
Why it fails:
Real example: User ran “DELETE FROM wp_posts WHERE post_type=’revision'” but made typo — deleted all posts instead of revisions. No backup = total data loss.
Correct approach:
Why it fails:
define('WP_ALLOW_REPAIR', true);
This line allows anyone to access yourdomain.com/wp-admin/maint/repair.php without login.
Security risk:
Correct approach:
Why it fails:
Correct approach:
Why it fails:
Correct approach:
define('WP_MAINTENANCE', true);
Why it fails:
Many people check DB_NAME but forget:
All four must be exactly correct.
Correct approach:
The “Error Establishing a Database Connection” looks scary, but it’s usually a quick fix once you identify the cause.
Here’s your action plan based on hosting type:
Total time: 30-60 minutes for most cases
Total time: 1-2 hours including prevention setup
When ceeveeglobal.com had this error last year, it was Solution 1 — a single extra space in DB_NAME broke everything. I spent 2 hours troubleshooting before noticing: define( 'DB_NAME', ' mysite_wp ' ); instead of define( 'DB_NAME', 'mysite_wp' );.
Since then, I’ve implemented:
Haven’t had the error since.
Drop a comment below with:
I respond to every comment and can help troubleshoot your specific situation.
Answer:
No, your content is still in the database. This error means WordPress can’t access the database, not that the database is deleted. Your posts, pages, and media files are intact.
However, take immediate action because:
Create a backup immediately, even with the error active.
Answer:
Yes! Solutions 1 and 2 are beginner-friendly:
Both use graphical interfaces (cPanel, FileZilla) with no command-line required.
If those don’t work, contact your hosting support — they’ll check if MySQL is running and can restart it for you.
Follow this decision tree:
Most people fix the issue with Solutions 1-3.
Answer:
This happens when:
Visit your site in incognito mode or after clearing cache. If you still see homepage, your caching plugin is masking the error.
Fix it now — visitors will eventually see the error when cache expires or when viewing non-cached pages.
Answer:
Indirectly, yes. Plugins can:
To test if a plugin is the cause:
/wp-content/plugins/ folder to /wp-content/plugins-disabled//plugins/, then disable plugins one by one to find the bad oneAnswer:
After migration, your old database credentials no longer work. Update wp-config.php with new host’s credentials:
Also update site URLs if domain changed (see Solution 6 restoration section).
Answer:
Try localhost first — it works for 95% of hosting setups.
Technical difference:
localhost → MySQL checks for socket file first, then TCP connection127.0.0.1 → Forces TCP connection onlySome hosts require 127.0.0.1 if socket file is misconfigured.
If neither works, ask your host for the exact DB_HOST value.
Answer:
Yes, if your site exceeds the max_connections limit:
Shared hosting: Usually 25-50 simultaneous connections (very limiting)
VPS: Configurable, default 151 connections
Solutions:
max_connections in MySQL config (VPS only)Answer:
They’re different errors but can appear together:
If you see a completely blank page (no error message), that’s White Screen. Check my guide on fixing WordPress White Screen of Death.
Answer:
If hosting confirms MySQL is running and credentials are correct:
" vs ')php
   define( 'DB_HOST', 'localhost' );
   define( 'DB_HOST', '127.0.0.1' );
   define( 'DB_HOST', 'localhost:3306' );
bash
mysql -u your_db_user -p -h localhost your_database_name
If this works but WordPress doesn’t connect, problem is in wp-config.php syntax.
After fixing database connection errors, you might see related issues:
Cause: Server storage reached 100% capacity, MySQL can’t write data
Related: Can trigger database connection errors if MySQL crashes
Internal link: How to Fix WordPress Database Disk Full Error
Cause: PHP memory limit too low for database operations
Related: Large database queries can exceed memory during connection
Internal link: How to Fix WordPress Memory Size Exhausted
Cause: Various causes including database issues, .htaccess problems
Related: Can occur simultaneously with database connection errors
Internal link: Fixing HTTP Error 500 in WordPress
Cause: PHP fatal errors preventing page rendering
Related: Can be caused by failed database connections
Internal link: How to Fix WordPress White Screen of Death
Cause: Server temporarily unable to handle requests
Related: MySQL overload can trigger 503 errors
Internal link: Understanding and Fixing 503 Service Unavailable
Get free WordPress & AI tips
Join 500+ readers. No spam, unsubscribe anytime.