Hey there, future WordPress whiz! Ever tried to visit your site, only to be greeted with a frustrating “DNS Server Not Responding” error? It’s like hitting a brick wall, but don’t worry—we’ve got your back! In this post, we’ll walk you through what this error means, why it happens, and how to fix it step-by-step. Let’s dive in!
What’s a DNS, Anyway?
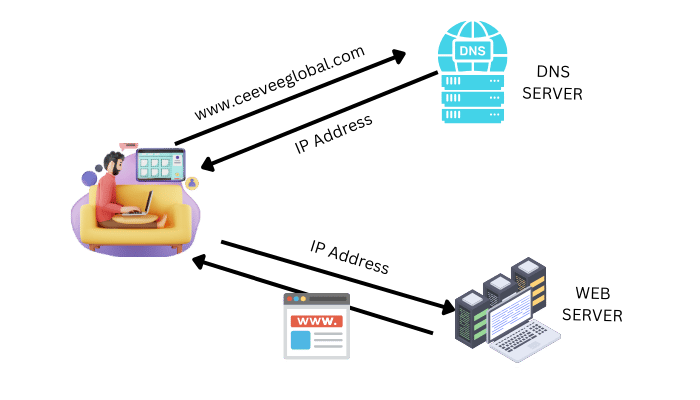
Imagine you want to visit your friend’s house, but you only know their name, not their address. If this example is applied to our case, even if we know the domain name of the website we need to go to, we do not know the IP address of the path to it.
Here, Domain Name System (DNS) is important for us to solve this matter. The Domain Name System (DNS) is like a magical phone book for the internet. It translates easy-to-remember domain names (like www.yourwebsite.com) into IP addresses that computers use to find each other. When this system hiccups, you might get the dreaded “DNS Server Not Responding” error.
Why Is This Happening?
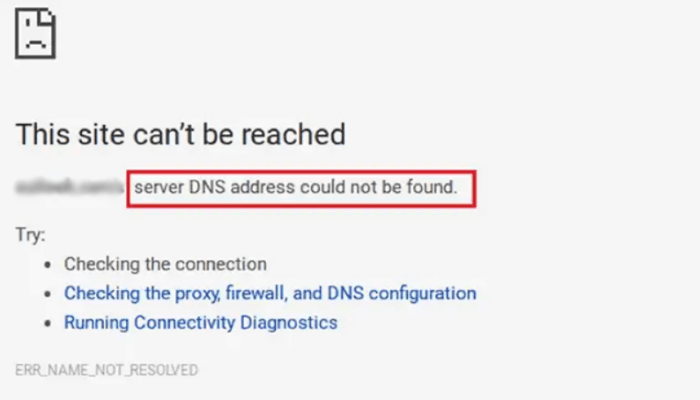
There are several reasons why you might encounter this error.
Sometimes, the problem is as simple as a shaky internet connection. A weak or intermittent internet connection can prevent your browser from communicating with the DNS server, causing this error to pop up.
Another possibility is browser problems; Your browser might be playing tricks on you. If there’s an issue with your browser’s settings or cache, it could interfere with DNS resolution.
Overprotective firewall or antivirus software can also block access, mistaking the DNS server communication for a potential threat.
Incorrect DNS server addresses are another common culprit. If the DNS settings are incorrect, your site won’t load because your computer can’t find the server to translate the domain name into an IP address.
Lastly, sometimes the problem lies within your WordPress setup. Internal DNS configuration issues within WordPress can further complicate the problem, leading to site inaccessibility and redirection issues.
How to Fix the “DNS Server Not Responding” Error
Encountering the “DNS Server Not Responding” error can feel like hitting a major roadblock, but don’t worry—with the right steps, you’ll have your site up and running again quickly.
By methodically following these troubleshooting tips, you can diagnose and resolve the issue efficiently.
Remember, persistence is key, and even if one solution doesn’t work, another might do the trick. It’s all about being patient and thorough. And for those times when you need an extra hand, tools like WP Error Expert are here to provide additional support.
So, let’s dive in and tackle this problem head-on!
1. Check Your Internet Connection
First things first—make sure your internet is working. Try visiting another website or using another device to see if the connection is stable. If everything else loads fine, then the issue is likely specific to your setup.
Example: If your favorite social media site loads, but your WordPress site doesn’t, the issue might not be with your internet connection but with your site or DNS settings.
2. Try a Different Browser
Your browser might be the culprit. Switch to another browser like Mozilla Firefox, Google Chrome, or Microsoft Edge. If your site loads there, it’s time to clear the cache and cookies on your main browser.
Steps to Clear Cache and Cookies:
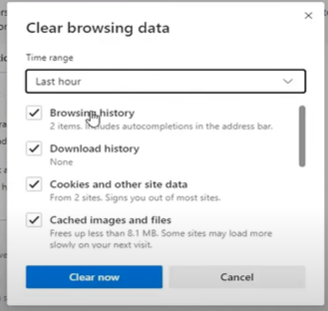
- Open your browser settings.
- Navigate to privacy or history.
- Clear browsing data, selecting “cookies” and “cached images and files.”
3. Disable Firewall or Antivirus Temporarily
Sometimes, your firewall or antivirus software is a bit too protective. Temporarily disable them to see if they’re the cause. Remember to turn them back on after testing, though!
Steps:
- Open your firewall or antivirus program.
- Find the option to disable or turn off protection.
- Test your site.
- Re-enable protection immediately after testing.
4. Change Your DNS Server Address
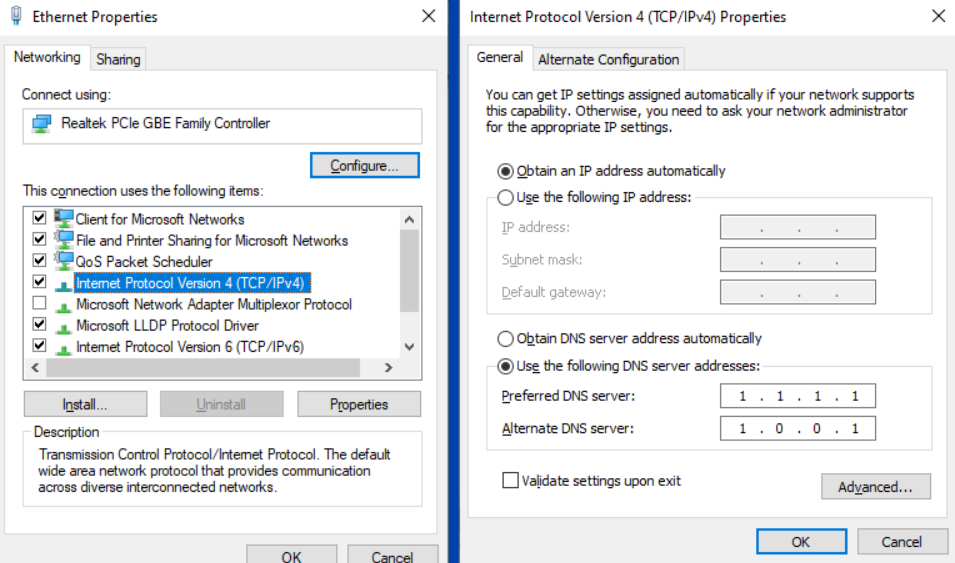
Updating your DNS server address can work wonders. Here’s how:
For Windows:
- Go to Control Panel > Network and Sharing Center.
- Click on your network connection (e.g., Wi-Fi).
- Click Properties.
- Select Internet Protocol Version 4 (TCP/IPv4) and click Properties.
- Choose “Use the following DNS server addresses.”
- Enter preferred DNS server: 8.8.8.8 and alternate DNS server: 8.8.4.4 (Google’s DNS).
For macOS:
- Go to System Preferences > Network.
- Select your network connection.
- Click Advanced.
- Go to the DNS tab.
- Click the + button and enter 8.8.8.8 and 8.8.4.4.
5. Flush Your DNS Cache
Clearing your DNS cache can help refresh the system. Here’s a quick way to do it on Windows:
- Open Command Prompt as an administrator.
- Type
ipconfig /flushdnsand press Enter.
For macOS:
- Open Terminal.
- Type
sudo killall -HUP mDNSResponderand press Enter.
6. Update Your Network Adapter Driver
An outdated network adapter driver can cause compatibility issues. Here’s how to update it:
- Open Device Manager.
- Find your network adapter.
- Right-click and select “Update driver.”
- Follow the prompts to search automatically for updated driver software.
7. Troubleshoot Network Problems
Sometimes, the issue is deeper in your network setup. Running a network troubleshooter can help identify and fix these problems:
- Open Control Panel.
- Go to Network and Sharing Center.
- Click on “Troubleshoot problems” and follow the prompts.
Example: If the troubleshooter finds that your network adapter is disabled, it will guide you through enabling it.
Meet WP Error Expert
Did you know there’s a nifty tool called WP Error Expert that can help you fix many WordPress errors, including the “DNS Server Not Responding” error? This AI-powered tool is like having a tech wizard at your fingertips, guiding you through fixes quickly and efficiently. WP Error Expert can diagnose and resolve issues, saving you time and frustration.
Conclusion
The “DNS Server Not Responding” error can be a real pain, but with these steps, you’ll be back online in no time. Remember, a stable internet connection and proper DNS settings are key. And if all else fails, our WP Error Expert tool is here to save the day!

