
Replace Vercel, Sentry & Plausible for $5/Month (Real Setup)
I replaced four paid subscriptions ($152/mo) with one $5/mo self-hosted server: real deployment, a…
Do you know WordPress runs on just 8 fundamental code concepts?
Most beginners copy-paste WordPress code from Stack Overflow without understanding what it actually does. I did the same thing for months until I realized I was just guessing. One wrong character in functions.php, and boom — White Screen of Death.
Here’s the truth: you don’t need to memorize thousands of functions. I’ll show you 8 WordPress code concepts that power every WordPress site — from simple blogs to complex e-commerce stores.
Get free WordPress & AI tips
Join 500+ readers. No spam, unsubscribe anytime.
Understanding these core WordPress code concepts will transform how you build and customize WordPress sites. No more guessing. No more breaking things accidentally.
By the end of this guide, you’ll understand:
Let’s start with the most important warning before diving into these WordPress code concepts.
Editing functions.php can break your entire site if you make one syntax error. I learned this the hard way when my client’s site went down.
Always follow these rules:
✅ Backup your site first — Don’t waste money on backup plugins. Watch how I built my own backup system in 15 minutes using AI (saves you $840/year)
✅ Use a child theme — Never edit parent theme files directly
✅ Test on staging site — If you have one available
✅ Or use Code Snippets plugin — Much safer than editing functions.php
One missing semicolon = White Screen of Death. You’ve been warned.
Now let’s dive into the essential WordPress code concepts that every developer should know.
Before we jump into specific WordPress code concepts, let’s talk about why this matters.
WordPress powers 43% of all websites. But here’s what most people don’t know: every WordPress plugin, theme, and custom functionality uses the same 8 core WordPress code concepts.
When you understand these WordPress programming fundamentals, you can:
These WordPress code concepts are the building blocks. Master them, and you’ll never feel helpless staring at WordPress code again.
The add_action() hook is one of the most important WordPress code concepts. It lets you add custom code at specific points in WordPress without modifying core files.
Think of WordPress actions as “when X happens, do Y.” It’s event-driven programming made simple.
add_action('wp_footer', 'add_footer_text');
function add_footer_text() {
    echo '<div style="text-align: center; padding: 20px; background: #f0f0f0;">
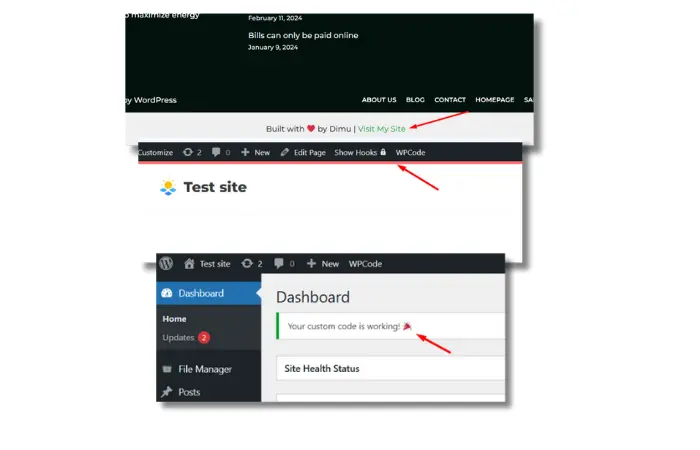
        Built with ❤️ by Dimu | <a href="https://ceeveeglobal.com">Visit My Site</a>
    </div>';
}
What this does: Adds a custom footer message to every page on your site.
You should see: A gray box with “Built with ❤️ by Dimu” at the footer.
If you don’t see it: Check for syntax errors. One missing semicolon or bracket breaks everything.
Many tutorials use console.log() in examples like this:
echo '<script>console.log("Hello");</script>';
This does work — but you can’t see it on your page. You have to open browser Developer Console (F12) to see the message. That’s why beginners think their code failed.
Always test with visible output first (text, colors, borders) so you know your code is running.
When you need to add functionality at specific WordPress events. Like adding a banner after every blog post or loading custom CSS on specific pages.
I use add_action() constantly. My AI tools page uses add_action to load custom JavaScript only on that page — not sitewide. Result? Faster load times and better performance.
Example 2: Add Custom CSS to All Pages
add_action('wp_head', 'my_custom_styles');
function my_custom_styles() {
    echo '<style>
        body { border-top: 5px solid #ff6b6b; }
    </style>';
}
What you’ll see: Red border at the top of every page.
Example 3: Admin Dashboard Notice
add_action('admin_notices', 'my_admin_notice');
function my_admin_notice() {
    echo '<div class="notice notice-success">
        <p>Your custom code is working! 🎉</p>
    </div>';
}
Where to see it: WordPress Admin Dashboard (top of the page when you log in).
Pro tip: The most common WordPress actions are wp_head, wp_footer, init, wp_enqueue_scripts, and admin_init. Start with these.
Filters are another crucial WordPress code concept. While actions “do something,” filters modify existing data before WordPress displays it.
This is how WordPress lets you transform content, change titles, modify excerpts, and customize output without editing template files.
add_filter('the_content', 'add_reading_time');
function add_reading_time($content) {
    // Only add to single posts
    if (is_single()) {
        $word_count = str_word_count(strip_tags($content));
        $reading_time = ceil($word_count / 200);
        $message = "<p style='background: #e3f2fd; padding: 15px; border-left: 4px solid #2196f3;'><strong>⏱️ Reading time: " . $reading_time . " minutes</strong></p>";
        return $message . $content;
    }
    return $content;
}
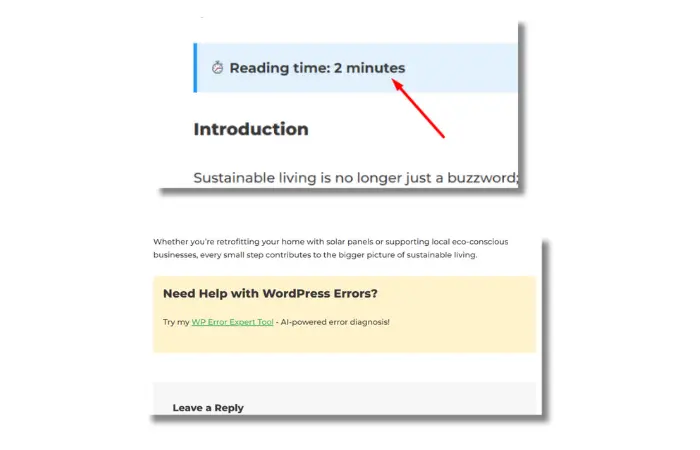
This automatically adds reading time to every post. No manual work needed.
You should see: A blue box with reading time estimate.
When you need to transform existing content. I use filters to add custom CTAs at the end of my WordPress error fix posts. One filter updates 40+ posts automatically.
Example: Change Excerpt Length
add_filter('excerpt_length', 'custom_excerpt_length');
function custom_excerpt_length($length) {
    return 30; // Change from default 55 words to 30
}
Example: Add Text After Every Post
add_filter('the_content', 'add_cta_after_post');
function add_cta_after_post($content) {
    if (is_single()) {
        $cta = '<div style="background: #fff3cd; padding: 20px; margin-top: 30px; border-radius: 5px;">
            <h3>Need Help with WordPress Errors?</h3>
            <p>Try my <a href="https://ceeveeglobal.com/wp-error-expert/">WP Error Expert Tool</a> - AI-powered error diagnosis!</p>
        </div>';
        return $content . $cta;
    }
    return $content;
}
Key difference: Actions add new functionality. Filters modify existing data. Both are essential WordPress code concepts you’ll use daily.
WP_Query is WordPress’s powerful way to fetch posts from the database. It’s one of the most flexible WordPress code concepts for displaying content.
The default WordPress loop shows all posts. WP_Query lets you get specific posts based on any criteria you want — categories, tags, custom fields, dates, and more.
function display_custom_posts() {
    $args = array(
        'posts_per_page' => 5,
        'category_name' => 'wordpress-errors', // Change to your category slug
        'orderby' => 'date',
        'order' => 'DESC'
    );
    $query = new WP_Query($args);

    if ($query->have_posts()) {
        echo '<div class="custom-posts">';
        while ($query->have_posts()) {
            $query->the_post();
            echo '<div style="margin-bottom: 20px; padding: 15px; border: 1px solid #ddd; border-radius: 5px;">';
            echo '<h3><a href="' . get_permalink() . '">' . get_the_title() . '</a></h3>';
            echo '<p>' . get_the_excerpt() . '</p>';
            echo '<a href="' . get_permalink() . '" style="color: #0073aa;">Read More →</a>';
            echo '</div>';
        }
        echo '</div>';
    } else {
        echo '<p>No posts found.</p>';
    }
    wp_reset_postdata();
}

// Add shortcode to use anywhere
add_shortcode('custom_posts', 'display_custom_posts');
Using Code Snippets Plugin (Recommended):
'category_name' => 'wordpress-errors' to match your actual category slug[custom_posts]You should see: A styled list of 5 posts from that category with borders and read more links.
If you see “No posts found”: Your category slug might be wrong. Go to Posts → Categories and check the actual slug.
When the default WordPress loop isn’t flexible enough. I use WP_Query on the homepage to show only featured WordPress error fixes — not all 45+ posts.
$args = array(
    'posts_per_page' => 10,        // Number of posts
    'category_name' => 'tutorials', // Category slug
    'tag' => 'beginner',           // Tag slug
    'orderby' => 'date',           // Sort by date
    'order' => 'DESC',             // Newest first
    'post_type' => 'post',         // Post type
    'meta_key' => 'featured',      // Custom field key
    'meta_value' => 'yes'          // Custom field value
);
Important: Always use wp_reset_postdata() after custom queries to avoid conflicts with the main loop. This resets global post data.
Shortcodes are reusable code snippets you can insert anywhere using simple brackets. They’re essential WordPress code concepts for creating custom, reusable elements.
Think of shortcodes like creating your own Gutenberg blocks, but lighter and more flexible.
add_shortcode('cta_button', 'my_button_shortcode');
function my_button_shortcode($atts) {
    // Set default values
    $atts = shortcode_atts(array(
        'text' => 'Click Here',
        'url' => '#',
        'color' => 'blue'
    ), $atts);

    // Return the button HTML
    return '<a href="' . esc_url($atts['url']) . '" style="display: inline-block; padding: 12px 24px; background: ' . esc_attr($atts['color']) . '; color: white; text-decoration: none; border-radius: 5px; font-weight: bold;">' . esc_html($atts['text']) . '</a>';
}
1. Add the code above to the Code Snippets plugin
2. Save and activate
3. Edit any post or page
4. Add this shortcode to the content:
[cta_button text="Try Free Tool" url="https://ceeveeglobal.com/tools/" color="green"]
You should see: A green button with “Try Free Tool” text.
Example: Simple Contact Box
add_shortcode('contact_box', 'contact_box_shortcode');
function contact_box_shortcode() {
    return '<div style="background: #f8f9fa; padding: 20px; border-left: 4px solid #007bff; margin: 20px 0;">
        <h3>Need WordPress Help?</h3>
        <p>Contact me: <a href="https://ceeveeglobal.com/contact/">Click Here</a></p>
    </div>';
}
Usage: [contact_box]
When you need the same element across multiple posts or pages. I use shortcodes for tool promotion boxes in my blog posts. Update one shortcode function, and all posts update automatically.
Shortcodes are perfect for WordPress performance optimization too — they’re lighter than page builder elements and load faster.
These functions represent critical WordPress code concepts for properly loading CSS and JavaScript. Never add scripts directly to header.php or footer.php — always use wp_enqueue.
function load_my_assets() {
    // Load CSS
    wp_enqueue_style('my-custom-style', get_stylesheet_directory_uri() . '/custom.css', array(), '1.0.0');

    // Load JavaScript with jQuery dependency
    wp_enqueue_script('my-custom-script', get_stylesheet_directory_uri() . '/custom.js', array('jquery'), '1.0.0', true);
}
add_action('wp_enqueue_scripts', 'load_my_assets');
Explanation:
get_stylesheet_directory_uri() gets your theme’s URLarray('jquery') means “load jQuery first, then my script”'1.0.0' is version number (for cache busting)true at the end means “load in footer for better performance”custom.js in your theme folder
jQuery(document).ready(function($) {
    $('body').prepend('<div style="background: yellow; padding: 10px; text-align: center;">Custom JS Loaded!</div>');
});
You should see: Yellow banner at the top saying “Custom JS Loaded!”
function load_my_assets() {
    // Only load on homepage
    if (is_front_page()) {
        wp_enqueue_script('homepage-slider', get_stylesheet_directory_uri() . '/slider.js', array('jquery'), '1.0.0', true);
    }

    // Only load on single posts
    if (is_single()) {
        wp_enqueue_style('single-post-style', get_stylesheet_directory_uri() . '/single-post.css');
    }
}
add_action('wp_enqueue_scripts', 'load_my_assets');
Always. This is not optional for WordPress development. If you’re adding CSS or JavaScript to WordPress, use wp_enqueue_style() and wp_enqueue_script(). Period.
I use wp_enqueue to load my custom scripts only on pages that need them. My WordPress Plugin Finder tool loads specific JavaScript — not on every page. This keeps the site fast.
Common mistake: Loading scripts in wp_head action. Use wp_enqueue_scripts action instead for proper loading. Need help debugging JavaScript errors? Check my WordPress Error Log guide.
Custom post types are powerful WordPress code concepts that let you create your own content types beyond default posts and pages.
Think of custom post types as adding new categories of content with their own admin menus, templates, and archive pages.
function create_tools_post_type() {
    $args = array(
        'labels' => array(
            'name' => 'Tools',
            'singular_name' => 'Tool',
            'add_new' => 'Add New Tool',
            'add_new_item' => 'Add New Tool',
            'edit_item' => 'Edit Tool'
        ),
        'public' => true,
        'has_archive' => true,
        'supports' => array('title', 'editor', 'thumbnail', 'excerpt'),
        'menu_icon' => 'dashicons-admin-tools',
        'rewrite' => array('slug' => 'tools'),
        'show_in_rest' => true  // Enables Gutenberg editor
    );

    register_post_type('tools', $args);
}
add_action('init', 'create_tools_post_type');
1. Add the code above to Code Snippets plugin
2. Save and activate
3. Go to WordPress Admin Dashboard
4. Go to Settings → Permalinks (IMPORTANT!)
5. Click “Save Changes” (this flushes rewrite rules)
6. Look in the left sidebar
You should see: A new “Tools” menu item with “Add New Tool” option.
If you get 404 errors:You forgot step 4-5. Always flush permalinks after registering custom post types. Read my WordPress 404 Error guide for more solutions.
When posts and pages aren’t enough for your content structure. My AI tools collection uses custom post types. Each tool has its own entry, separate from blog posts.
Pro tip: After registering custom post types, always go to Settings → Permalinks and click “Save Changes” to flush rewrite rules. Otherwise, you’ll get 404 errors on your custom post type pages.
The WordPress REST API is one of the most modern WordPress code concepts. It lets you access your WordPress content via URLs that return JSON data.
Think of it as opening a window into your WordPress database from anywhere — mobile apps, external websites, JavaScript applications.
You don’t need to write code to use REST API. Just access these URLs in your browser:
Get all posts:
https://yoursite.com/wp-json/wp/v2/posts
Get 5 posts from specific category:
https://yoursite.com/wp-json/wp/v2/posts?per_page=5&categories=12
Search posts:
https://yoursite.com/wp-json/wp/v2/posts?search=wordpress
yoursite.com with your actual domain
https://ceeveeglobal.com/wp-json/wp/v2/posts?per_page=3
You should see: JSON data with post information (title, content, excerpt, etc.)
per_page: Number of posts to return (default: 10)categories: Filter by category IDtags: Filter by tag IDsearch: Search posts by keywordorderby: Sort by date, title, modified, etc.order: ASC (ascending) or DESC (descending)page: Pagination for large datasets
fetch('https://yoursite.com/wp-json/wp/v2/posts?per_page=5')
    .then(response => response.json())
    .then(posts => {
        posts.forEach(post => {
            console.log(post.title.rendered);
        });
    });
When you need WordPress data outside WordPress itself. I use REST API to power some of my FastAPI tools that interact with WordPress data programmatically.
Security note: WordPress REST API is public by default. For sensitive data, use authentication. Most sites disable /wp-json/wp/v2/users endpoint for security. Learn more in my WordPress Security Audit guide.
Transients are WordPress’s built-in caching system — one of the most underrated WordPress code concepts for performance optimization.
They provide temporary data storage with automatic expiration. No Redis, Memcached, or external caching plugins required.
function get_popular_posts() {
    // Try to get cached data
    $popular_posts = get_transient('my_popular_posts');

    // If no cache exists or expired
    if ($popular_posts === false) {
        // Run expensive query
        $args = array(
            'posts_per_page' => 10,
            'meta_key' => 'post_views',
            'orderby' => 'meta_value_num',
            'order' => 'DESC'
        );
        $popular_posts = new WP_Query($args);

        // Store in cache for 1 hour (3600 seconds)
        set_transient('my_popular_posts', $popular_posts, 3600);
    }

    return $popular_posts;
}
Add this code to test transient speed:
function test_transient_speed() {
    // First load (no cache)
    delete_transient('test_data');
    $start = microtime(true);
    $data = get_transient('test_data');
    if ($data === false) {
        sleep(2); // Simulate slow query
        $data = "Slow data loaded";
        set_transient('test_data', $data, 3600);
    }
    $first_load = microtime(true) - $start;

    // Second load (from cache)
    $start = microtime(true);
    $data = get_transient('test_data');
    $second_load = microtime(true) - $start;

    echo "First load: " . round($first_load, 4) . " seconds<br>";
    echo "Second load: " . round($second_load, 4) . " seconds<br>";
    echo "Speed improvement: " . round($first_load / $second_load) . "x faster";
}
add_action('wp_footer', 'test_transient_speed');
You should see: First load takes ~2 seconds, second load is almost instant (0.0001 seconds).
When you have expensive operations that don’t change frequently. My WP Error Expert tool caches AI responses using transients. Same error searched twice? Instant results from cache instead of calling the API again.
function get_latest_tools() {
    $tools = get_transient('latest_tools_cache');

    if ($tools === false) {
        $args = array(
            'post_type' => 'tools',
            'posts_per_page' => 10,
            'orderby' => 'date',
            'order' => 'DESC'
        );
        $query = new WP_Query($args);
        $tools = $query->posts;

        // Cache for 6 hours (21600 seconds)
        set_transient('latest_tools_cache', $tools, 21600);
    }

    return $tools;
}
I once reduced a page load time from 8 seconds to 1.2 seconds just by caching one slow WP_Query with transients. That’s the power of proper caching.
Important: Transients are stored in wp_options table by default. For high-traffic sites, use persistent object caching (Redis) for better performance. Check my WordPress Performance Analyzer to see if you need it.
Here’s a cheat sheet for choosing the right WordPress code concept for your needs:
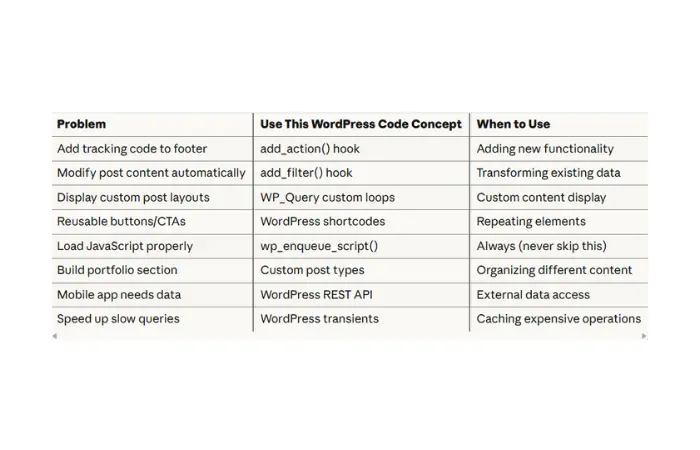
Save this table. You’ll reference it constantly when building WordPress sites.
Understanding WordPress code concepts is one thing. Actually using them is different.
Here’s my recommended learning path:
Week 1: Master WordPress Hooks
Week 2: Work with Data
Week 3: Asset Management & Custom Content
Week 4: Advanced Concepts
Don’t try to learn all 8 WordPress code concepts at once. Master one per week. That’s how I learned, and that’s what works.
After teaching these WordPress code concepts for years, I’ve seen the same mistakes repeatedly:
1. Editing parent theme files directly Always use child themes. Theme updates wipe your changes otherwise. Learn how to create a child theme properly.
2. Forgetting wp_reset_postdata() after WP_Query This causes weird bugs with your main loop. Always reset. I’ve spent hours debugging this mistake.
3. Not sanitizing shortcode attributes Use esc_url(), esc_attr(), and esc_html() to prevent security issues. Never trust user input.
4. Loading scripts without dependencies If your script needs jQuery, specify it: array('jquery'). Otherwise, you’ll get “$ is not defined” errors.
5. Not setting transient expiration Without expiration, transients become permanent database clutter. Always set a reasonable expiration time.
6. Hardcoding instead of using WordPress functions Use get_template_directory_uri() instead of hardcoded paths. Your code will break when you change themes.
7. Not flushing permalinks after custom post types Register a custom post type, then go to Settings → Permalinks → Save. Otherwise, you’ll get 404 errors.
Learn from my mistakes. I’ve made all of these errors and spent hours debugging them.
You don’t have to learn these WordPress code concepts alone. Here are tools that helped me:
1. Code Snippets Plugin — Practice WordPress code safely without editing functions.php directly. If something breaks, just disable the snippet. No White Screen of Death. Download from WordPress.org
2. Query Monitor Plugin — See exactly which hooks fire, database queries run, and where your code slows down. Essential for learning WordPress code concepts. Shows every SQL query, PHP error, and HTTP request.
3. WordPress Code Reference — Official documentation at developer.wordpress.org. Search any function, hook, or class. Bookmark it.
4. My AI-Powered WordPress Tools:
These tools use the same WordPress code concepts I just taught you. Study how they work.
5. Local Development Environment — Test code on your computer before deploying live. I use Local by Flywheel. Watch my Local by Flywheel tutorial to set it up.
These 8 WordPress code concepts power every WordPress site you’ve ever used — from simple blogs to WooCommerce stores to complex membership sites.
Understanding these fundamental WordPress code concepts transforms you from someone who installs plugins to someone who builds solutions. That’s the difference between WordPress users and WordPress developers.
You don’t need to master all 8 WordPress code concepts today. Start with add_action() and add_filter() — they’re the foundation everything else builds on.
Here’s your action plan:
This week: Try adding one action hook with visible output (like the footer text example)
Next week: Create a simple filter to add reading time to posts
Week 3: Build something custom with WP_Query
Week 4: Start exploring REST API and transients
I learned these WordPress code concepts by breaking things. You will too. That’s okay. Just keep your backups current and learn from every error.
Pro tip from 15 years of WordPress experience: Use the Code Snippets plugin instead of editing functions.php directly. It’s safer, easier to debug, and you can disable snippets without deleting code.
Don’t forget to set up backups before experimenting. Watch my video: Stop Paying for Backup Plugins – Build Your Own with AI in 15 Minutes. I’ll show you exactly how to create a custom backup system that costs $0.
These WordPress code concepts are your foundation. Build on them, experiment with them, break things and fix them. That’s how you become a real WordPress developer.
Which WordPress code concept are you trying first? Drop a comment below. I read every single one and reply with help if you’re stuck. Let’s build something together.
The most important WordPress code concepts for beginners are add_action() and add_filter() hooks. These two WordPress code concepts form the foundation of WordPress development. Master hooks first, then move to WP_Query, shortcodes, and wp_enqueue functions. Start with actions and filters — everything else builds on understanding how WordPress hooks work.
add_action() adds new functionality at specific WordPress events, while add_filter() modifies existing data before display. Actions “do something” (add tracking code, send emails), filters “change something” (modify post content, change titles). Both are essential WordPress code concepts, but serve different purposes. Use actions to insert new features, use filters to transform existing content.
No, you don’t have to edit functions.php directly. Use the Code Snippets plugin for safer WordPress code management, or create a custom plugin. Only edit functions.php if you’re using a child theme. Never edit parent theme files — updates will erase your changes. Code Snippets is the safest way to practice WordPress code concepts without risking your site.
Learn WordPress code concepts in this order: 1) add_action() and add_filter() hooks (foundation), 2) WP_Query for custom loops, 3) wp_enqueue for loading assets properly, 4) shortcodes for reusable content, 5) custom post types, 6) REST API, and 7) transients. Master hooks first — they’re used in all other WordPress code concepts and understanding them makes everything else easier.
Yes, syntax errors in WordPress code can cause the White Screen of Death. Always backup before adding custom code. Use a child theme or Code Snippets plugin. Test on staging sites first. One missing semicolon can break everything. Learn proper WordPress code concepts to avoid common mistakes and keep your site safe. Read my White Screen of Death guide for recovery steps.
WordPress hooks (actions and filters) work the same in themes and plugins. They’re core WordPress code concepts that let themes and plugins interact with WordPress without modifying core files. Plugins use hooks to add features, themes use hooks to modify display. Both follow the same WordPress code concepts and execution order. Hooks are the standard way to extend WordPress functionality.
WordPress transients cache temporary data with automatic expiration. Use transients to cache slow database queries, external API responses, or expensive calculations. Transients are essential WordPress code concepts for performance optimization. They reduce server load and speed up sites without external caching plugins. Set appropriate expiration times — I use 1 hour for frequently updated data, 24 hours for static content.
WP_Query gives you complete control over which posts display, while the default loop shows all posts. WP_Query is one of the most flexible WordPress code concepts — filter by category, tag, custom fields, dates, post types, and more. Use WP_Query when the default loop isn’t flexible enough. Always use wp_reset_postdata() after custom queries to avoid conflicts with the main loop.
Test WordPress code by adding visible output first. Use echo statements with HTML and CSS styling so you can see results immediately. Don’t use console.log() for initial testing — it’s invisible unless you open browser Developer Console. Start with simple examples like adding colored text or borders. Once you confirm code works, then optimize it. Check my WordPress Error Log guide for debugging tips.
Core WordPress code concepts (hooks, WP_Query, shortcodes, wp_enqueue) have been stable for years and work across all modern WordPress versions. However, newer features like REST API and Gutenberg support require WordPress 4.7+ and 5.0+ respectively. Always check WordPress documentation for version-specific features. These fundamental WordPress code concepts you learned will work on any WordPress site running version 4.0 or newer.