You may be thinking of giving your website an update. Otherwise, you may think of changing the website to suit your latest business. So how to build a new WordPress site while the old site is live?
However, taking the current site offline and creating a new WordPress website is something that should not be done. Doing so will affect your website’s rankings and traffic. Your income will also be affected.
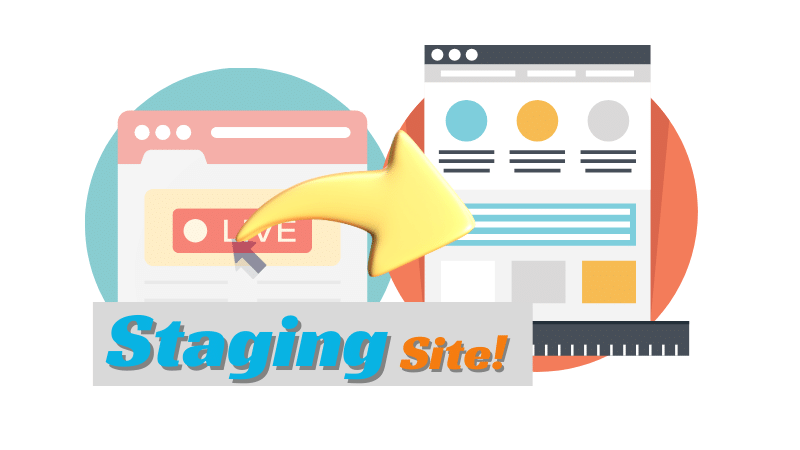
This beginner-friendly tutorial answers the key question of how to build a new WordPress site while the old site is live via Staging Sites.
Did you know that building a new WordPress site while the old site is live requires careful planning and execution? Let’s find out.
What are the ways to build a new WordPress site while the old site is live?

There are several ways to do this.
- Local Development Environment: This method involves creating a replica of your live site on your local computer. Tools like Local by Flywheel make this process user-friendly. We have explained this in detail in a previous article. Here, Once the new site is ready, you can easily migrate it to your live server.
- Staging Site: Today’s topic is the staging site. Many web hosting providers offer staging functionality. This creates a temporary subdomain or directory on your existing server specifically for development purposes. You can work on your new website on the staging site, and once satisfied, push the changes to your live domain.
- Subdirectory: In another way, you can install a fresh WordPress instance within a subdirectory of your existing domain. This approach is relatively simple but may require some configuration to avoid conflicting styles or plugins with your main site.
- Development Plugin: Plugins like WP Staging or WP Development allow you to create a staging environment directly within your WordPress dashboard. This method is convenient but may require some technical knowledge to configure properly.
- Third-Party Migration Service: Several paid services specialize in website migrations. These services can help you create a staging site or migrate your new website to your live server seamlessly. While convenient, this option can be more expensive than the other methods.
Let’s talk about other methods later, here we will discuss about building a new WordPress site while the old site is live by Staging Site.
Let’s Build Your Staging Site!
Before doing this method, the following essential things should be taken care of.
- Access to your web hosting control panel: This is the command center where you manage your website’s files and settings.
- A dash of technical curiosity: A basic understanding of navigating folders and files will be helpful for this process.
Step 1: Craft Your Staging Subdomain
- Find the Control Panel: Access the Control Panel using your web host control panel login credentials. Most providers offer a clear login button or link on their home page.

- Navigate to “Domains” or “Subdomains”. The exact terminology may vary depending on your provider, but you’re looking for the section that allows you to manage domains and subdomains on your website.

- Time to name your playground! Click on an option like “Manage Domain” or “Add Subdomain”. Here, you will create a subdomain – a temporary address for your staging site. In the example video, “staging.ceeveeglobal.com” is used. It is a staged site

- Choose an existing username for your subdomain. This username is most likely associated with your main domain.
- Fully host the domain: Click on “Fully Host That Domain” or a similar option. This allocates server resources for your subdomain, ensuring that it has the power to run your staging site effectively.
Step 2: Backing Up for Peace of Mind (Optional but Recommended)
As I always say, a recent backup of your live site is very important for your security. I have learned many lessons by not doing so. In the beginning, one of my clients was upset with me for not being able to recover his site. But today he has become my best friend.
Anyway, while creating a staging site having a recent backup of your live site is always a good practice. This ensures you can restore it in case of any unexpected issues. Most web hosting providers offer backup options within their control panels.
Explore your provider’s backup options and create a fresh backup for your peace of mind.
Step 3: Duplicating Your Live Site with a Plugin
- Log in to your WordPress admin dashboard on your live site. This is where you manage your content, plugins, and themes.
- Head over to the “Plugins” section and click on “Add New.”
- Search for “Duplicator” by Snap Creek. This free plugin is a handy tool for creating a complete archive of your website, including files, database, and settings.
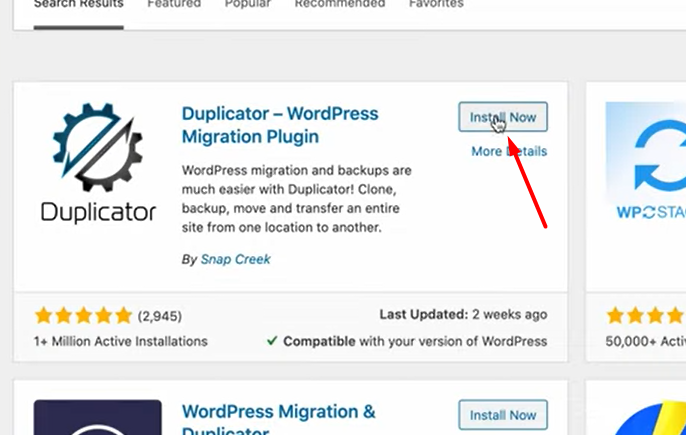
- Install and activate Duplicator. Follow the on-screen instructions to activate the plugin and get it ready for use.
- Create a New Package: Duplicator will guide you through creating a compressed package for your entire website. Click “Next” to start the scanning process. Duplicator then meticulously scans your site’s files, database, and settings, ensuring a complete copy for your platform.
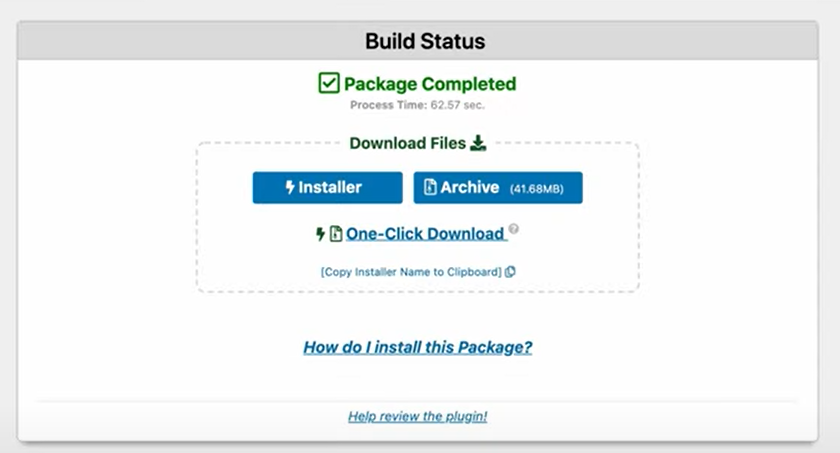
- Download Installer and Archive Files: After the scan is complete, Duplicator will provide two downloadable files: installer.php and an archive file (usually a .zip file). These files contain the blueprint for your staging site. Download both files and keep them easily accessible for the next step.
Step 4: Uploading the Files to Your Subdomain
- Return to your Web Hosting Control Panel. Navigate back to the control panel where you manage your website’s files and settings.
- Unearth the File Management Treasure: Locate the file management section of your control panel. This is often called “File Manager” or “FTP Manager.” Here, you’ll upload the files required to create your staging site.
- Common File Manager Locations for cPanel Users: Look for the “File Manager” icon within the “Files” section.
- Seek Out Your Subdomain’s Directory: Imagine your web hosting server as a filing cabinet, and each website has its own designated folder. Your subdomain also has its own folder within the server’s storage. Locate the directory for your newly created subdomain. This will typically be within the “public_html” directory on your server.
- Tip: If you’re unsure about the exact location, consult your web hosting provider’s documentation for guidance on finding subdomain directories.
- Upload the Magic Files: Now comes the fun part! Using the upload functionality of your file manager, upload both the installer.php and archive files you downloaded from Duplicator in step 3. Ensure they are uploaded to the correct subdomain directory you identified in step 3.
Step 5: Launching the Staging Site Installer
- Open a New Web Browser Tab.
- Craft the Staging Site URL: In the address bar, type the URL of your subdomain followed by “/installer.php.” For example, if your subdomain is “staging.ceeveeglobal.com“, you would type “staging.ceeveeglobal.com/installer.php” This will launch the Duplicator installer, the program that will assemble your staging site using the files you uploaded.
- Follow the Installer’s Guidance: The Duplicator installer will guide you through a few essential steps to finalize the staging site setup. Here’s a breakdown of what to expect:
- Database Configuration: You’ll need to create a new database for your staging site. Most control panels offer a user-friendly interface for creating databases. The installer will often prompt you for details like database name, username, and password. You can create these within your control panel’s database management section and provide the credentials during the installation process.
- Security Measures: The installer might recommend certain security measures, like updating the default admin username. It’s wise to follow these recommendations to enhance the security of your staging site.
- Congratulations! Your Staging Site Awaits! Once you’ve completed the installer’s prompts, your staging site should be up and running! You can now access it using the URL you created in step 5.2.
Step 6: Exploring and Experimenting on Your Staging Site
Your staging site is now a playground for exploration and experimentation! You can:
- Test New Themes and Plugins: Install and test new themes and plugins on your staging site before deploying them to your live site. This allows you to ensure they function correctly and visually complement your website without affecting your visitors’ experience.
- Make Design Tweaks: Play around with your website’s design elements – fonts, colors, layouts – on the staging site to see how they look before making changes to your live site.
- Stage New Content Creation: Craft new blog posts, pages, or other content on the staging site. Once you’re happy with the results, you can seamlessly transfer them to your live site.
Remember, any changes you make on the staging site won’t affect your live website. It’s a safe space to tinker and test until you’re confident and ready to showcase your website’s makeover to the world!
Bonus Tip: Transferring Changes to Your Live Site (Optional)
While this guide focuses on creating a staging site, you might eventually want to implement the changes you tested on your live site. There are various methods for achieving this, depending on your comfort level and technical expertise. Here are a couple of options:
- Manual Transfer: Carefully replicate the changes you made on the staging site to your live site by editing themes, plugins, and content directly. This approach requires some technical knowledge.
- Migration Plugins: Explore plugins designed to migrate websites between domains or subdomains. These plugins can automate the transfer process, making it easier for beginners.
In Conclusion
With a manual staging site in place, you now have a safe haven to experiment and test modifications before unleashing them on your live website.
This approach empowers you to refine your website’s functionality and design with confidence, ensuring a consistently exceptional experience for your visitors. So, unleash your creativity, embrace the power of staging, and watch your website flourish!