
AI Generated WordPress Plugin Security, Tested for Real
I tested AI generated WordPress plugin security with the official Plugin Check tool: 21…

For users wondering why Mautic 5 is missing in Coolify, you aren’t alone. Many Coolify users expect a seamless integration with Mautic, but are met with disappointment when it’s nowhere to be found. In this guide, we’ll explore why Mautic 5 vanished and provide a step-by-step solution to deploy it manually using Docker Compose. Whether you’re a WordPress enthusiast or a marketing automation aficionado, this solution will get you back on track.

When you open Coolify, looking for Mautic under the “Add Resource” section, it can be frustrating to find nothing. The absence of a one-click app or template for Mautic 5 in Coolify is due to recent updates and changes in the Coolify ecosystem, necessitating a manual workaround.
Mautic is a powerful open-source marketing automation tool, seamlessly integrating with WordPress to enhance customer engagement and conversion rates. Its absence from Coolify means WordPress users need an alternative method to keep their automation processes running smoothly.
Get free WordPress & AI tips
Join 500+ readers. No spam, unsubscribe anytime.
Before diving into the deployment process, ensure you have the following prerequisites:
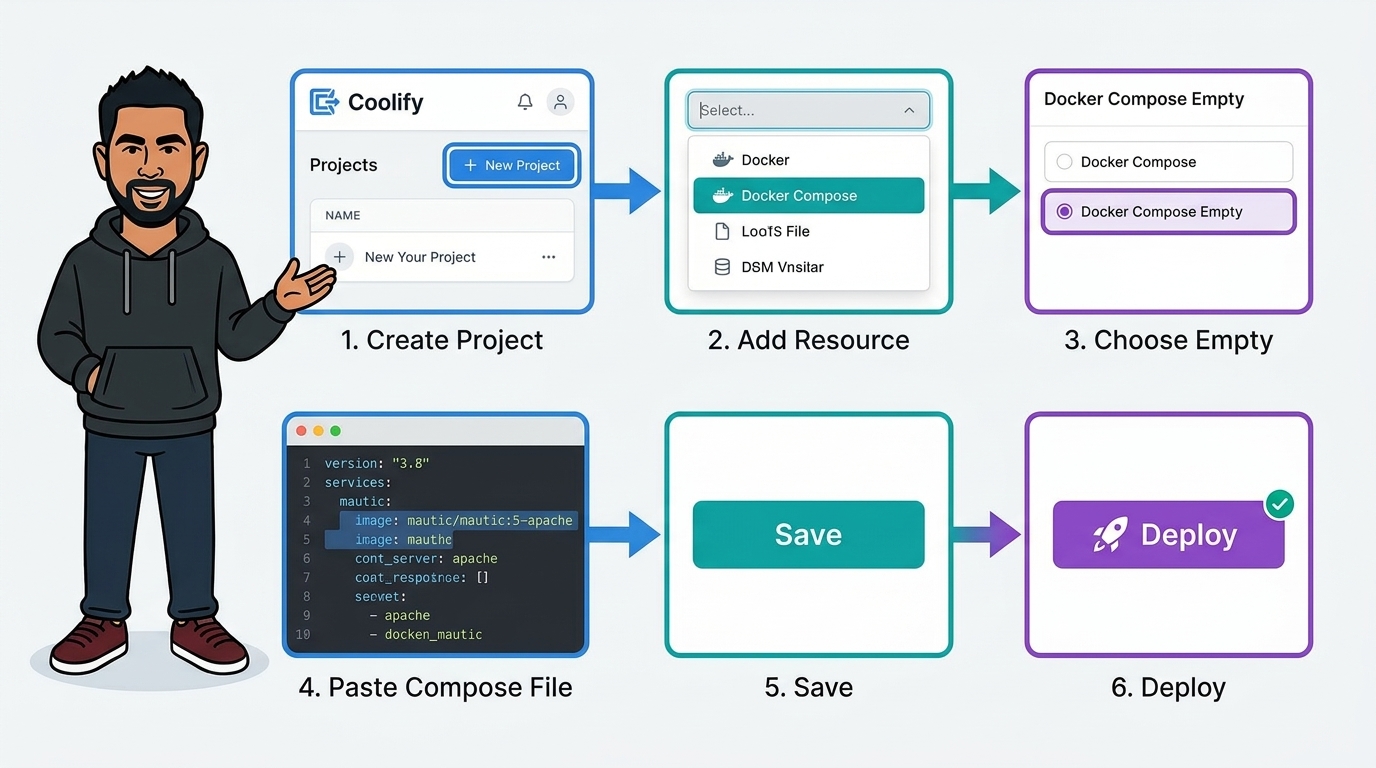
Despite its absence in Coolify, deploying Mautic 5 is straightforward with Docker Compose. Follow these steps to get started:
version: "3.9"

services:
  db:
    image: mysql:8.0
    environment:
      - MYSQL_ROOT_PASSWORD=${SERVICE_PASSWORD_64_MYSQLROOT}
      - MYSQL_DATABASE=${MYSQL_DATABASE:-mautic}
      - MYSQL_USER=${SERVICE_USER_MYSQL}
      - MYSQL_PASSWORD=${SERVICE_PASSWORD_64_MYSQL}
    volumes:
      - mysql-data:/var/lib/mysql
    healthcheck:
      test: mysqladmin ping --silent --user=$${SERVICE_USER_MYSQL} --password=$${SERVICE_PASSWORD_64_MYSQL}
      start_period: 30s
      interval: 10s
      timeout: 5s
      retries: 5

  rabbitmq:
    image: rabbitmq:3
    environment:
      - RABBITMQ_DEFAULT_VHOST=${RABBITMQ_DEFAULT_VHOST:-mautic}
    volumes:
      - rabbitmq-data:/var/lib/rabbitmq

  mautic_web:
    image: mautic/mautic:latest
    ports:
      - "8880:80"
    volumes:
      - mautic_data/config:/var/www/html/config:z
      - mautic_data/logs:/var/www/html/var/logs:z
      - mautic_data/media/files:/var/www/html/docroot/media/files:z
      - mautic_data/media/images:/var/www/html/docroot/media/images:z
      - mautic_data/plugins:/var/www/html/docroot/plugins:z
      - mautic_data/vendor:/var/www/html/vendor:z
      - mautic_data/bin:/var/www/html/bin:z
      - mautic_data/cron:/opt/mautic/cron:z
    environment:
      - SERVICE_FQDN_MAUTIC_80
      - DOCKER_MAUTIC_LOAD_TEST_DATA=${MAUTIC_LOAD_TEST_DATA:-false}
      - DOCKER_MAUTIC_RUN_MIGRATIONS=${MAUTIC_RUN_MIGRATIONS:-false}
      - MAUTIC_DB_HOST=${MYSQL_HOST:-db}
      - MAUTIC_DB_PORT=${MYSQL_PORT:-3306}
      - MAUTIC_DB_DATABASE=${MYSQL_DATABASE:-mautic}
      - MAUTIC_DB_USER=${SERVICE_USER_MYSQL}
      - MAUTIC_DB_PASSWORD=${SERVICE_PASSWORD_64_MYSQL}
      - MAUTIC_MESSENGER_DSN_EMAIL=amqp://guest:guest@rabbitmq:5672/mautic/messages
      - MAUTIC_MESSENGER_DSN_HIT=amqp://guest:guest@rabbitmq:5672/mautic/messages
    depends_on:
      db:
        condition: service_healthy
      rabbitmq:
        condition: service_started
    healthcheck:
      test: ["CMD", "curl", "-f", "http://localhost"]
      interval: 15s
      timeout: 10s
      retries: 15

  mautic_cron:
    image: mautic/mautic:latest
    volumes:
      - mautic_data/config:/var/www/html/config:z
      - mautic_data/logs:/var/www/html/var/logs:z
      - mautic_data/media/files:/var/www/html/docroot/media/files:z
      - mautic_data/media/images:/var/www/html/docroot/media/images:z
      - mautic_data/plugins:/var/www/html/docroot/plugins:z
      - mautic_data/vendor:/var/www/html/vendor:z
      - mautic_data/bin:/var/www/html/bin:z
      - mautic_data/cron:/opt/mautic/cron:z
    environment:
      - DOCKER_MAUTIC_ROLE=mautic_cron
      - MAUTIC_DB_HOST=${MYSQL_HOST:-db}
      - MAUTIC_DB_PORT=${MYSQL_PORT:-3306}
      - MAUTIC_DB_DATABASE=${MYSQL_DATABASE:-mautic}
      - MAUTIC_DB_USER=${SERVICE_USER_MYSQL}
      - MAUTIC_DB_PASSWORD=${SERVICE_PASSWORD_64_MYSQL}
      - MAUTIC_MESSENGER_DSN_EMAIL=amqp://guest:guest@rabbitmq:5672/mautic/messages
      - MAUTIC_MESSENGER_DSN_HIT=amqp://guest:guest@rabbitmq:5672/mautic/messages
    depends_on:
      mautic_web:
        condition: service_healthy

  mautic_worker:
    image: mautic/mautic:latest
    volumes:
      - mautic_data/config:/var/www/html/config:z
      - mautic_data/logs:/var/www/html/var/logs:z
      - mautic_data/media/files:/var/www/html/docroot/media/files:z
      - mautic_data/media/images:/var/www/html/docroot/media/images:z
      - mautic_data/plugins:/var/www/html/docroot/plugins:z
      - mautic_data/vendor:/var/www/html/vendor:z
      - mautic_data/bin:/var/www/html/bin:z
      - mautic_data/cron:/opt/mautic/cron:z
    environment:
      - DOCKER_MAUTIC_ROLE=mautic_worker
      - MAUTIC_DB_HOST=${MYSQL_HOST:-db}
      - MAUTIC_DB_PORT=${MYSQL_PORT:-3306}
      - MAUTIC_DB_DATABASE=${MYSQL_DATABASE:-mautic}
      - MAUTIC_DB_USER=${SERVICE_USER_MYSQL}
      - MAUTIC_DB_PASSWORD=${SERVICE_PASSWORD_64_MYSQL}
      - MAUTIC_MESSENGER_DSN_EMAIL=amqp://guest:guest@rabbitmq:5672/mautic/messages
      - MAUTIC_MESSENGER_DSN_HIT=amqp://guest:guest@rabbitmq:5672/mautic/messages
    depends_on:
      mautic_web:
        condition: service_healthy

volumes:
  mysql-data:
  rabbitmq-data:
  mautic_data: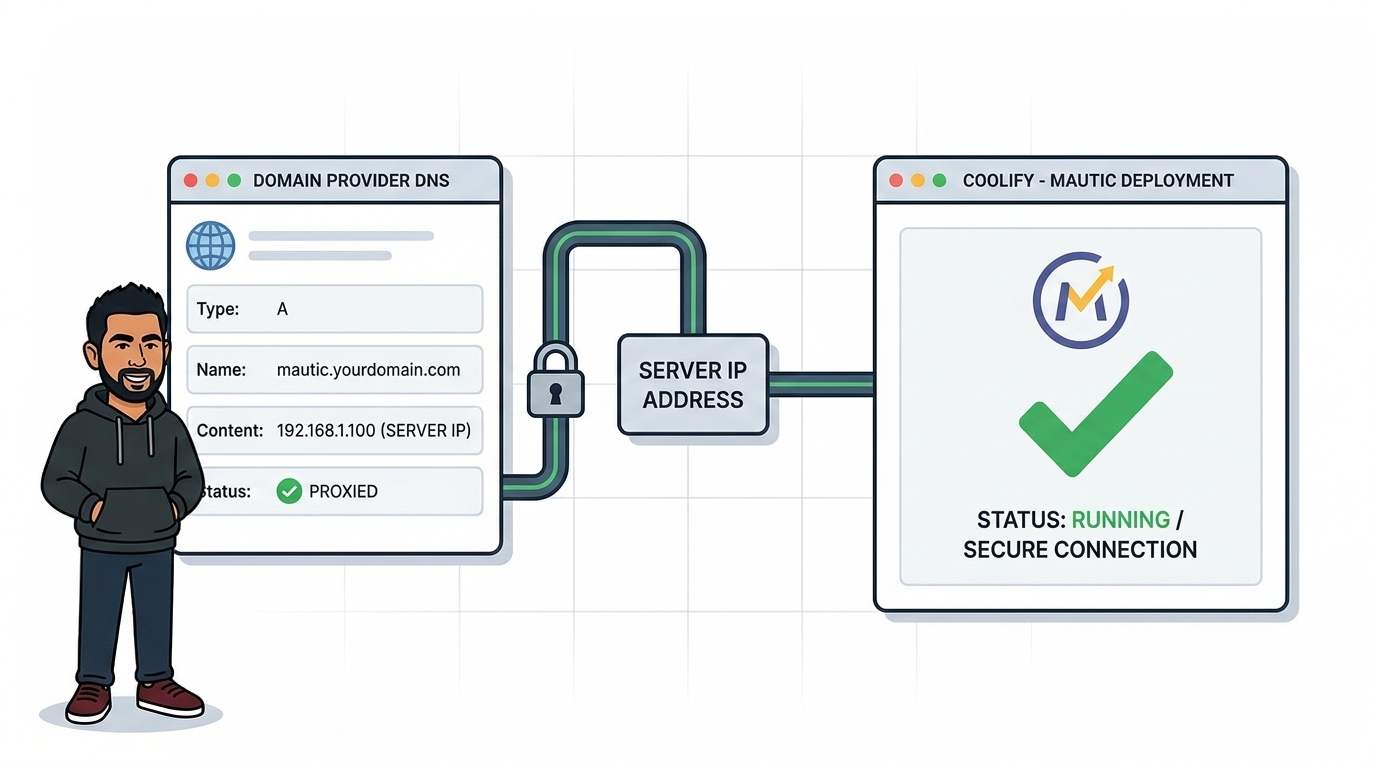
For personalised branding, connecting a custom domain to your Mautic instance is beneficial. Here’s how:
Deploying Mautic through Docker Compose opens avenues for customization and optimization. Here are expert-level tips:
For an all-in-one solution, consider hosting providers like Vultr or InterServer for reliable and cost-effective hosting solutions. Additionally, Namecheap remains a top choice for domain management.
If you encounter issues during the installation or deployment process, consider the following tips:
While the absence of Mautic 5 in Coolify might initially seem daunting, the manual deployment using Docker Compose is a robust alternative. By following the steps outlined above, WordPress users can regain the powerful marketing automation capabilities Mautic offers. Embrace these changes, and enhance your online strategies with a tailored approach.
To recap, deploying Mautic 5 in Coolify involves creating a new project, adding a Docker Compose resource, and configuring your domain. With these steps, you can restore Mautic’s capabilities even without direct Coolify support.
Have questions or need further clarification? Feel free to leave a comment below, and we’ll be happy to assist you.
Explore more WordPress tips and tricks|/wordpress-tips-tricks
Learn how to optimize your WordPress site for SEO|/wordpress-seo-optimization