Here’s the thing most WordPress users don’t realize: wp-config.php is your site’s hidden control panel. It’s where you can troubleshoot critical errors, boost security, increase memory limits, and enable debugging — all without touching the WordPress dashboard.
But it’s also the file that scares people the most. One wrong edit, and your site can go completely blank.
That’s exactly why I wrote this guide. I’ll show you how to safely find, access, and edit the wp-config.php file — even if you’ve never touched code before. Plus, I’ll share the exact tweaks I use on every site I build.
Let’s dive in.
What is the wp-config.php File? (And Why It Matters)
The wp-config.php file is WordPress’s main configuration file. Think of it as the bridge between your WordPress software and your database.
Without this file, WordPress can’t:
- Connect to your database
- Load your content
- Authenticate users
- Run your site
Here’s what it controls:
- Database connection details (name, username, password, host)
- Security keys and salts (protects against hackers)
- Debug mode settings (shows errors for troubleshooting)
- Memory limits (prevents crashes from resource-heavy plugins)
- Table prefix (adds security layer to your database)
The file gets created automatically when you install WordPress. But knowing how to edit it gives you total control over your site’s behaviour.
Note: I’ve edited wp-config.php hundreds of times over the years. It’s intimidating at first, but once you understand the basics, it becomes one of your most powerful troubleshooting tools. Just always — and I mean ALWAYS — backup first.
Where to Find the wp-config.php File
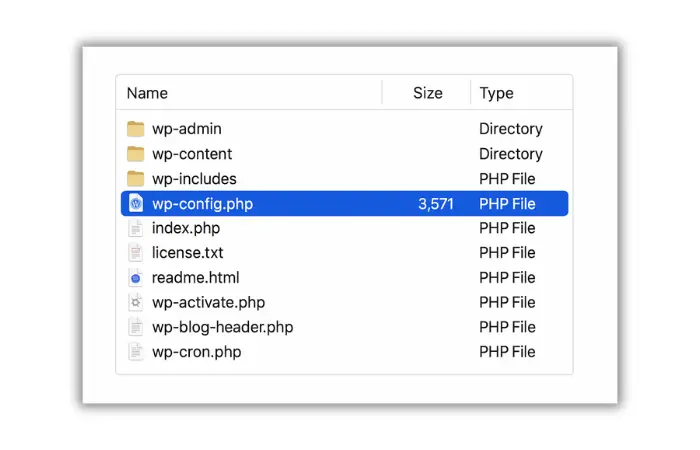
The wp-config.php file lives in your WordPress root directory. Depending on your hosting setup, this folder is usually called:
public_htmlwwwhtdocs- Your domain name (e.g.,
example.com)
You can access this file three ways:
Method 1: File Manager (cPanel)
This is the easiest method if your host uses cPanel.
- Log in to your hosting cPanel
- Navigate to Files → File Manager
- Open the
public_htmlfolder (or your site’s root folder) - Scroll down until you see
wp-config.php - Right-click and select Edit
A warning will pop up about editing code. Click Edit again to proceed.
Method 2: FTP Client (FileZilla)
If you prefer FTP access or don’t have cPanel:
- Download and install FileZilla (it’s free)
- Get your FTP credentials from your hosting provider
- Connect to your server using FileZilla
- Navigate to your WordPress root directory
- Right-click
wp-config.phpand select View/Edit
FileZilla will open the file in your default text editor. Make changes, save, and FileZilla will upload the updated file automatically.
Method 3: SSH Terminal (Advanced)
For those comfortable with the command line:
cd /path/to/your/wordpress/
nano wp-config.php
Make your edits, then press Ctrl + X, then Y, then Enter to save.
Pro Tip: On localhost setups like XAMPP or Local by Flywheel, navigate to xampp/htdocs/your-site-folder or wherever your local WordPress installation lives.
CRITICAL: Always Back Up Before Editing
Before you touch wp-config.php, create a backup. This isn’t optional.
If you make a mistake, your entire site can go down instantly. Here’s why:
- One missing semicolon = site crash
- Wrong database password = database connection error
- Incorrect syntax = white screen of death
How to back up wp-config.php:
Option 1: Download via FTP
- Right-click the file in FileZilla
- Select Download
- Save it to your computer as
wp-config-backup.php
Option 2: Duplicate via File Manager
- Right-click
wp-config.php - Select Copy
- Name the copy
wp-config-backup.php
Option 3: Full Site Backup If your hosting has automatic backups (like Cloudways or WP Engine), create a manual backup before editing anything critical.
My Reality Check: I learned this lesson the hard way. A few years ago, I edited wp-config.php without backing up first. I mistyped one character, hit save, and the entire site went blank. Took me 2 hours to figure out what went wrong. Now I back up every single time — no exceptions.
Understanding the wp-config.php File Structure
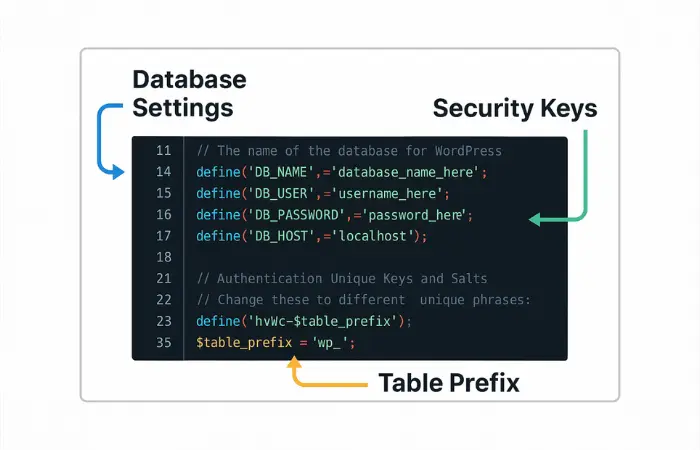
Let’s break down the main sections you’ll see when you open wp-config.php.
1. Database Settings
This section connects WordPress to your MySQL database:
// ** MySQL settings ** //
define( 'DB_NAME', 'your_database_name' );
define( 'DB_USER', 'your_database_username' );
define( 'DB_PASSWORD', 'your_database_password' );
define( 'DB_HOST', 'localhost' );
When you’d change this:
- Moving to a new host
- Fixing “Error Establishing Database Connection”
- Restoring from backup with different database credentials
2. Authentication Keys and Salts
These are random strings that encrypt your login cookies:
define('AUTH_KEY',         'put your unique phrase here');
define('SECURE_AUTH_KEY',  'put your unique phrase here');
define('LOGGED_IN_KEY',    'put your unique phrase here');
define('NONCE_KEY',        'put your unique phrase here');
define('AUTH_SALT',        'put your unique phrase here');
define('SECURE_AUTH_SALT', 'put your unique phrase here');
define('LOGGED_IN_SALT',   'put your unique phrase here');
define('NONCE_SALT',       'put your unique phrase here');
When you’d change this:
- After your site gets hacked
- As part of regular security maintenance (every 6-12 months)
How to generate new keys: Visit the WordPress.org Secret Key Generator and copy-paste the generated keys into your file.
3. Database Table Prefix
$table_prefix = 'wp_';
The default is wp_, but you can change it to add a security layer:
$table_prefix = 'wp_a7x9_';
Warning: Only change this during initial setup. Changing it on an existing site requires updating your entire database structure.
4. Debug Mode (Turned Off by Default)
define( 'WP_DEBUG', false );
This controls whether WordPress displays errors on your screen.
5 Essential wp-config.php Edits Every WordPress User Should Know
Now let’s get into the practical stuff. These are the most common edits I make on WordPress sites.
Edit #1: Enable Debug Mode (Troubleshooting Errors)
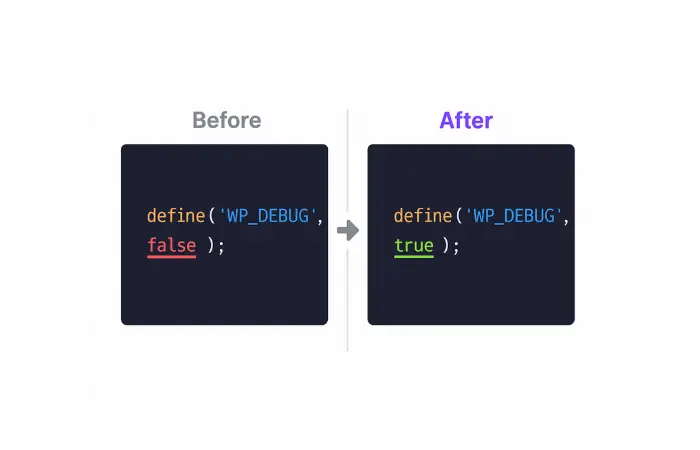
When something breaks on your site but you can’t see what’s wrong, enable debug mode.
Find this line:
define( 'WP_DEBUG', false );
Change it to:
define( 'WP_DEBUG', true );
What this does:
- Shows PHP errors, warnings, and notices on your screen
- Helps identify plugin conflicts
- Reveals theme issues
Save the file, then visit your site. You’ll now see error messages that were previously hidden.
Important: Turn debug mode OFF once you’ve fixed the issue. Leaving it on exposes sensitive information to visitors and slows down your site.
Bonus: Log Errors to a File Instead If you don’t want errors displayed publicly, log them to a file:
define( 'WP_DEBUG', true );
define( 'WP_DEBUG_LOG', true );
define( 'WP_DEBUG_DISPLAY', false );
@ini_set( 'display_errors', 0 );
This creates a debug.log file in /wp-content/ with all errors recorded privately.
My Tip: I always use the log file method on live sites. It lets me troubleshoot without exposing errors to visitors. Check the WordPress Enable Error Log guide for more details.
Edit #2: Increase WordPress Memory Limit (Fix “Memory Exhausted” Errors)
If you see errors like “Fatal error: Allowed memory size exhausted,” your site is running out of PHP memory.
Add this line before “That’s all, stop editing”:
define( 'WP_MEMORY_LIMIT', '256M' );
What this does:
- Increases PHP memory from the default 40MB to 256MB
- Prevents crashes from resource-heavy plugins
- Allows larger image uploads
You can try 128M first and increase if needed. Most shared hosting plans allow up to 256M or 512M.
Why this happens: Page builders, e-commerce plugins, and image-heavy sites consume lots of memory. This edit gives WordPress more room to work.
For more context on fixing memory issues, check out How to Fix WordPress Memory Size Exhausted.
Edit #3: Change Database Table Prefix (Security Enhancement)
Hackers know the default database prefix is wp_, making it easier to target your tables with SQL injection attacks.
During initial setup, change this:
$table_prefix = 'wp_';
To something random like:
$table_prefix = 'wp_secure2024_';
Only use letters, numbers, and underscores. No special characters.
CRITICAL WARNING: Do NOT change this on an existing site unless you also update every table name in your database via phpMyAdmin. One mistake will break your entire site.
Edit #4: Regenerate Security Keys (After a Hack)
If your site was hacked or you suspect unauthorized access, regenerate your security keys immediately.
Step 1: Visit WordPress.org Secret Key Generator
Step 2: Copy all 8 generated lines
Step 3: Find the authentication section in wp-config.php and replace the existing keys with the new ones:
define('AUTH_KEY',         'new-unique-key-here');
define('SECURE_AUTH_KEY',  'new-unique-key-here');
// ... (replace all 8 lines)
What this does:
- Logs out all users immediately (including hackers)
- Forces everyone to log in again with fresh, encrypted sessions
Dimu’s Security Practice: I regenerate these keys every 6 months as preventive maintenance. Takes 2 minutes and significantly reduces security risks.
For more security hardening tips, see Understanding SSL, HTTP, and HTTPS.
Edit #5: Disable Automatic Updates (Optional)
WordPress auto-updates for security by default. But if you want manual control:
Add this line:
define( 'AUTOMATIC_UPDATER_DISABLED', true );
When you’d do this:
- You prefer testing updates on staging first
- You manage updates manually via WP-CLI or hosting tools
- You have a managed WordPress host that handles updates
Important: Only disable this if you have a reliable update system in place. Security updates protect against known vulnerabilities.
Advanced wp-config.php Tweaks (For Developers)
These are more technical edits that solve specific problems.
Disable Post Revisions (Save Database Space)
WordPress saves every edit as a revision. On large sites, this bloats your database.
Disable completely:
define( 'WP_POST_REVISIONS', false );
Or limit to 5 revisions:
define( 'WP_POST_REVISIONS', 5 );
Change Autosave Interval
Default is 60 seconds. Increase to reduce server load:
define( 'AUTOSAVE_INTERVAL', 300 ); // 5 minutes
Increase Upload File Size Limit
If you need to upload large files:
@ini_set( 'upload_max_size' , '64M' );
@ini_set( 'post_max_size', '64M');
@ini_set( 'max_execution_time', '300' );
Force SSL for Admin Area
define( 'FORCE_SSL_ADMIN', true );
This forces HTTPS for your WordPress admin login and dashboard. For full SSL setup, read Understanding SSL and HTTPS for WordPress.
Move wp-content Directory (Security)
Advanced users can move the wp-content folder to a custom location:
define( 'WP_CONTENT_DIR', '/path/to/new/wp-content' );
define( 'WP_CONTENT_URL', 'https://example.com/new-content' );
Common wp-config.php Errors and How to Fix Them
Error: “Error Establishing a Database Connection”
Cause: Wrong database credentials in wp-config.php
Fix:
- Check your database name, username, and password
- Verify with your hosting provider
- Try changing
DB_HOSTfromlocalhostto127.0.0.1
For a complete guide, see Resolving Database Connection Errors.
Error: “White Screen of Death”
Cause: Syntax error in wp-config.php (missing semicolon, quote, etc.)
Fix:
- Restore your backup immediately
- Check every line you edited for typos
- Use a code validator to check syntax
Full troubleshooting guide: Fix WordPress White Screen of Death.
Error: “500 Internal Server Error” After Editing
Cause: PHP syntax error or permission issue
Fix:
- Revert to your backup
- Check file permissions (should be 644 for wp-config.php)
- Review the exact line you changed
More details: Fixing HTTP Error 500 in WordPress.
Best Practices for Editing wp-config.php Safely
After 15 years of working with WordPress, here’s what I’ve learned:
✅ DO:
- Always back up before editing
- Use a plain text editor (Notepad++, Sublime Text, VS Code)
- Test changes on a staging site first
- Document what you changed and why
- Keep your backup file outside the web root
❌ DON’T:
- Never use Microsoft Word or Google Docs (they add hidden formatting)
- Don’t edit directly on a live site without backup
- Don’t share your wp-config.php file publicly (contains database passwords)
- Never leave debug mode enabled on production sites
- Don’t change table prefix on existing sites without database updates
My Workflow:
- Download the current wp-config.php via FTP
- Save as
wp-config-backup-[DATE].phpon my computer - Make edits in a local text editor
- Test the syntax in a code validator
- Upload to staging site first
- If everything works, upload to live site
- Immediately check if site loads properly
Quick Reference: wp-config.php File Location
Shared Hosting (cPanel): public_html/wp-config.php
VPS/Dedicated Server: /var/www/html/wp-config.php /home/username/public_html/wp-config.php
Localhost (XAMPP): C:/xampp/htdocs/your-site/wp-config.php
Localhost (MAMP): /Applications/MAMP/htdocs/your-site/wp-config.php
Localhost (Local by Flywheel): ~/Local Sites/your-site/app/public/wp-config.php
Wrapping Up: Your wp-config.php Cheat Sheet
The wp-config.php file is one of the most powerful files in WordPress. It’s your direct line to:
- Troubleshooting critical errors with debug mode
- Boosting security by changing database prefixes and regenerating keys
- Improving performance by increasing memory limits
- Controlling WordPress behavior at the core level
Key takeaways:
- Always backup first — One wrong character can crash your site
- Use debug mode for troubleshooting — It reveals hidden errors instantly
- Regenerate security keys regularly — Simple 2-minute security boost
- Increase memory limits if needed — Fixes “memory exhausted” errors
- Turn off debug mode when done — Never leave it on in production
Dimu’s Final Tip: Bookmark this guide. You won’t edit wp-config.php often, but when you need to, having a trusted reference makes all the difference. I still reference my own notes before making changes — even after 15 years.
Need more help with WordPress errors? Check out:
- How to Clear Cache in WordPress
- Fix the 404 Error in WordPress
- WordPress 500 Internal Server Error
- Use AI to Detect WordPress Errors
Or try the WP Error Expert tool for AI-powered WordPress error analysis.
Have questions about editing wp-config.php? Drop a comment below. I personally respond to every question because I remember what it was like learning this stuff. We’re all in this together. 🎯
Frequently Asked Questions (FAQs)
Can I delete the wp-config.php file?
No. Deleting wp-config.php will completely break your WordPress site. WordPress needs this file to connect to the database. If it’s missing, you’ll see the WordPress installation screen instead of your site.
Where is the wp-config.php file located in WordPress?
The wp-config.php file is in your WordPress root directory, usually public_html or www. Access it via FTP, File Manager (cPanel), or SSH terminal.
What happens if I edit wp-config.php wrong?
If you make a syntax error, your site will likely show a white screen, “Error Establishing Database Connection,” or 500 Internal Server Error. This is why backing up before editing is critical — you can restore the working version immediately.
Is it safe to edit wp-config.php?
Yes, as long as you follow best practices: backup first, use a plain text editor, avoid Microsoft Word or Google Docs, test on staging first, and document your changes. Thousands of WordPress developers edit this file daily without issues.
How do I enable debug mode in WordPress?
Open wp-config.php and change define( 'WP_DEBUG', false ); to define( 'WP_DEBUG', true );. This displays PHP errors on your site. Turn it off after troubleshooting by changing it back to false.
Can I edit wp-config.php from WordPress dashboard?
No. WordPress intentionally does not allow editing wp-config.php from the dashboard because one mistake could lock you out completely. You must access it via FTP, File Manager, or SSH.
What are WordPress security keys and salts?
Security keys and salts are random strings in wp-config.php that encrypt your login cookies. They protect against session hijacking and brute force attacks. Regenerate them regularly for better security using the WordPress.org key generator.
How do I increase the WordPress memory limit?
Add this line to wp-config.php before “That’s all, stop editing”: define( 'WP_MEMORY_LIMIT', '256M' );. This increases memory from 40MB to 256MB and prevents “memory exhausted” errors.